# FLO.W - Full Documentation > Complete documentation content for LLMs. > For a summary with links, see https://21notion.com/llms.txt --- # Notion Template Design Philosophy - How FLO.W Helps You Build a Reliable Second Brain (https://21notion.com/en/docs/about) What does a typical knowledge worker face every day? WeChat, Lark, and DingTalk constantly ringing; leaders scheduling meetings at any time; colleagues asking for data from last week; daily reports that require effort to fabricate a bunch of encrypted communications. After work, you want to teach yourself AI for a side hustle, and also need to find time to read, learn, watch shows, play games, and date - every task feels important, but you don't know what to do first, so you scroll through your phone to temporarily put aside all worries. All of the above reflects my own experience. Over the years, this has become the driving force for my testing of various note-taking software. Initially, I researched this for personal interest, but later I treated it as a life project: could I find the most suitable tool for everyone, and then solve problems related to efficiency improvement, learning advancement, workflow building, and knowledge management? This Template is a phased achievement after 4 years of my note-taking software reviews. Our goal is certainly not to learn how to use a specific tool, nor should we treat time management as the primary goal. What I believe is truly important is being able to find a set of methods and workflows that suit you, so that whether you're using Lark, Siyuan, Obsidian, or Apple Notes, or the newly launched FLO.W all-in-one Template, it can help you build a reliable second brain, allowing you to focus on truly important thinking and creation. The fastest way for any productivity tool to deliver value is to use it to clear today's memory burden - that is, to record things you can't or don't want to forget right now in the simplest way possible with this tool, and then go do what you should be doing, because you no longer need to worry about forgetting. What runs counter to improving efficiency is actually spending too much time researching and imagining how much benefit productivity tools can bring you. Although this statement may discourage the majority of users who might purchase my Template on impulse, this ultimately represents my true perspective on tools. I don't intend to lie, and my Template will not have designs that are superficial and only increase anxiety. --- # Purchase Guide (https://21notion.com/en/docs/get-started) ## Why Choose FLO.W If you've read this far, it shows you have a genuine desire to improve your Notion skills and productivity. But before making a decision, let me ask you a few questions: * Do you often feel overwhelmed by tasks, unsure where to start? * Do you have many ideas and inspirations that always slip away before you can capture them? * Have you tried many note-taking methods but never found the one that suits you? * Do you feel like there's never enough time, often working overtime without obvious results? If any of the above resonated with you, then **FLO.W** is designed for you. *** ## 🎯 What Problems Can FLO.W Solve ### From Chaos to Order FLO.W is based on a **three-level filtering system** that presents the right amount of information, in the right way, at the right time: * **Level 1: Today's Focus** — Open Notion daily and only see the 3-5 most important tasks * **Level 2: Context Switching** — Enter specific modules where 80% of daily operations are completed within two clicks * **Level 3: Deep Dive** — Only access when needed to avoid information overload ### Four Core Modules Covering All Scenarios | Module | Problem It Solves | What You'll Gain | | -------------------- | ----------------------------------------------- | -------------------------------------------------- | | **Task Management** | Too many tasks to remember, confused priorities | Clear daily tasks, never miss important items | | **Note System** | Scattered knowledge, can't find when needed | Structured knowledge base, accessible anytime | | **Project Tracking** | Opaque project progress, often delayed | Visual project board, control progress at a glance | | **Area Planning** | Fuzzy long-term goals, efforts lack direction | Clear life map, every step has meaning | *** ## 🛒 Choose Your Edition **Best for:** Those who want to quickly experience the Notion workflow without needing too many additional services **Includes:** * ✅ Complete FLO.W v1.0 Template * ✅ Detailed illustrated + video user manual * ✅ Full coverage of basic features **Summary:** Ready to use, saves time and effort 👉 [Buy Basic Edition](/pricing) **Best for:** Those who want guidance to avoid detours and connect with like-minded users **Includes:** * ✅ All Basic Edition benefits * ✅ Private Q\&A community * ✅ Irregular practical case sharing * ✅ Continuous iOS Shortcuts updates **Summary:** Ask questions anytime, worry-free usage 👉 [Buy Professional Edition](/pricing) Advanced Edition Most Popular **Best for:** Long-term Notion users who want lasting benefits from a one-time purchase **Includes:** * ✅ All Professional Edition benefits * ✅ **Free major version upgrades** * ✅ **Long-term value guarantee** * ✅ Exclusive core user community * ✅ Priority dedicated service The FLO.W Template will continue to iterate and upgrade, with each major version update containing numerous new features and optimizations. Based on the current update pace, the value of 2-3 upgrades already exceeds the price difference between Advanced and Basic editions. **Choosing Advanced Edition = One-time investment, permanent benefits**. 👉 [Buy Advanced Edition](/pricing) *** ## Still Have Questions? Check [Purchase Related Questions](/docs/faq/before-purchase) for more, or contact us through: * 📧 Email: [eryidebiji@gmail.com](mailto:eryidebiji@gmail.com) * 🎮 Discord: [Join the Discord channel to connect with more Notion enthusiasts](https://discord.gg/nPf7YJasru) * 🐦 Twitter: [@eryidebiji](https://x.com/eryidebiji) * 📕 Xiaohongshu: [Eryi's Notes](https://www.xiaohongshu.com/user/profile/5b613e2711be105522cb9b6f) * 📺 Bilibili: [Eryi's Notes](https://space.bilibili.com/319417) * 💬 WeChat Official Account: Eryi's Notes (Click to view QR code) --- # Feature Overview (https://21notion.com/en/docs) import { Download, FileText, Star, BookOpen, Layout, PenTool, CheckSquare, Folder, Map, Globe, Film, Target, Package, Gamepad2, CreditCard, Brain, MousePointer, Zap, Settings, Calculator, Compass, HelpCircle, LifeBuoy, Wrench } from 'lucide-react'; ## Basics Before starting with FLO.W, please understand these basics: } title="Notion Download" href="/docs/notion-download"> Download and install Notion app } title="Template Import Guide" href="/docs/template-import-guide"> Learn how to import and use the Template ## Quick Start Master FLO.W's core features and get started quickly: } title="Template Overview" href="/docs/basic-feature/template-overview"> Understand the Template's core design philosophy } title="Homepage Navigation" href="/docs/basic-feature/homepage"> Learn to use the Template's Homepage and navigation module } title="Note System" href="/docs/basic-feature/note-taking"> Use note-taking functionality } title="Task Management" href="/docs/basic-feature/task-management"> Master the task management system } title="Project Management" href="/docs/basic-feature/project-management"> Manage your projects } title="Area Management" href="/docs/basic-feature/area"> Organize different life Areas } title="Web Clipper" href="/docs/basic-feature/web-clipper"> Save web content *** ## Lifestyle Tracking Use FLO.W to record and manage your life: } title="Movie Tracker" href="/docs/lifestyle/movie-tracker"> Record movie viewing experience and ratings } title="Habits Tracker" href="/docs/lifestyle/habits-tracker"> Build good lifestyle habits } title="Assets Inventory" href="/docs/lifestyle/assets-inventory"> Manage personal assets and items } title="Gaming Tracker" href="/docs/lifestyle/gaming-tracker"> Record game progress and ratings } title="Subscription Tracker" href="/docs/lifestyle/subscription-tracker"> Manage various subscription services ## Advanced Usage Explore FLO.W's advanced features: } title="Notion AI" href="/docs/advance-feature/notion-ai"> Use AI features to boost efficiency } title="Quick Buttons" href="/docs/advance-feature/notion-button"> Create interactive buttons } title="Database Automation" href="/docs/advance-feature/automation"> Configure automated workflows } title="Formula Application" href="/docs/advance-feature/formula"> Master Notion formula usage ## Property Reference Learn about the configuration and usage of various Database Properties: } title="Note Properties" href="/docs/properties/note"> Configure various Properties for Notes } title="Task Properties" href="/docs/properties/task"> Set Property fields for Tasks } title="Project Properties" href="/docs/properties/project"> Configure Property fields for Projects } title="Clipper Properties" href="/docs/properties/explore"> Learn more Property configurations ## FAQ Encountering problems? Check these common questions: } title="Before Purchase" href="/docs/faq/before-purchase"> Version selection and purchase questions } title="Getting Started" href="/docs/faq/getting-started"> Onboarding and template import } title="Customization" href="/docs/faq/customization"> Template modification and personalization } title="System Design" href="/docs/faq/system-design"> Understanding template design philosophy } title="Troubleshooting" href="/docs/faq/troubleshooting"> Common issues and error fixes } title="Upgrade & Support" href="/docs/faq/support"> Version upgrade and technical support ## Technical Support If you need technical support, join our [Lark community](/docs/faq/support#join-feishu-group) --- # Notion Download (https://21notion.com/en/docs/notion-download) ## Notion Installation and Download ### Windows **Method 1: Download Cloud Installation Package** * [Quark Cloud Drive](https://pan.quark.cn/s/e72959da3f41) **Method 2: Visit Notion Official Website to Download** * [Official Website](https://www.notion.com/zh-cn/desktop) ### Apple Users #### iPhone / iPad Users Search for Notion in the App Store and install ![202511174505.png](https://pic.eryinote.com/PicGo/202511171252520.png) #### Mac Users **Method 1: Download Cloud Installation Package** * [Quark Cloud Drive](https://pan.quark.cn/s/7ddf4197e1f1) **Method 2: Visit Notion Official Website to Download** * [Official Website](https://www.notion.com/zh-cn/desktop) ### Android / Huawei Users Notion's Android installation situation has changed. I'm keeping the historical installation methods below so you can try them if needed, but please note that they may no longer work on some devices. Whether installation succeeds can depend on your device model, system version, and current signature verification. The more reliable option right now is still: * Search for `Notion` in Google Play and install it there * If Google Play is unavailable on your device for now, you can use Notion in the browser first * For first-time login, we recommend choosing "Sign in with email". If you do not have an account yet, follow the registration guide below #### Android Users * Historical installation package (also applicable to HarmonyOS): [Click Here](https://pan.quark.cn/s/ee23057d8a7f) > Note: This historical package is kept only for optional self-testing. It may fail on some devices because of package aging, system restrictions, or signature verification. > Login Recommendation: On first login, choose "Sign in with email". If you haven't registered, please complete registration first. #### Huawei Users * Historical Android installation package (also applicable to HarmonyOS): [Click Here](https://pan.quark.cn/s/ee23057d8a7f) > Note: This historical package is kept only for optional self-testing. It may fail on some devices because of package aging, system restrictions, or signature verification. > Login Recommendation: On first login, choose "Sign in with email". If you haven't registered, please complete registration first. #### Browser Direct Login Notion not only supports mobile and desktop, but also direct browser login without installation. If other installation methods fail, try using the browser for faster access. * Browser login URL: [Click Here](https://www.notion.com/zh-cn) ## Notion Account Registration 1. Visit the official website: [Click Here](https://www.notion.com/zh-cn) 2. Click the \[Login] button in the top right corner ![Safari Browser 20251117 AI Workspace, Your Intelligent Assistant. Notion016113@2x.png](https://pic.eryinote.com/PicGo/202511171400294.png) 3. Follow the instructions below and click continue ![202511174510.png](https://pic.eryinote.com/PicGo/202511171356126.png) 4. Enter your email and click continue 5. Notion will send a verification code to your email. Check your inbox for this code. If you can't find it, it might be in your \[Spam] folder. > Reminder: If you don't receive the verification code, please check your spam folder or try again later. ![202511174514.png](https://pic.eryinote.com/PicGo/202511171402584.png) 6. Return to the registration page, enter the email verification code, then click \[Continue] to log in ![Safari Browser 20251117 Notion - Login016117@2x.png](https://pic.eryinote.com/PicGo/202511171402490.png) 7. Enter your custom name, then click \[Continue] ![202511174518.png](https://pic.eryinote.com/PicGo/202511171404016.png) 8. Next, Notion will ask you which scenarios you plan to use it for. Choose according to your needs. Only one selection is allowed, but don't worry if you choose wrong - it won't affect subsequent usage. ![202511174520.png](https://pic.eryinote.com/PicGo/202511171404646.png) 9. Next, Notion will recommend corresponding Templates based on your selected scenario. You can choose the Templates you need or click "Skip for now". After making your selection, click \[Continue] ![202511174522.png](https://pic.eryinote.com/PicGo/202511171406033.png) 10. Next, Notion will prompt you to download the desktop client. If you don't need the client, click \[Skip] repeatedly until you can log in directly through the browser ![202511174524.png](https://pic.eryinote.com/PicGo/202511171407238.png) 11. Successfully registered and logged into Notion ![202511174525.png](https://pic.eryinote.com/PicGo/202511171407794.png) ## Notion Chinese Localization Currently, Notion includes official Chinese localization. If you find your Notion interface is in English, please follow the instructions below to modify it. 1. Click \[Settings] to enter settings ![202511174527.png](https://pic.eryinote.com/PicGo/202511171410334.png) 2. Find the \[Chinese] option at \[Preferences] - \[Language] ![202511174529.png](https://pic.eryinote.com/PicGo/202511171411839.png) ## Notion Beginner Guide Notion beginners often get lost in complex concepts and Templates. This article uses 5 practical Notion tips to help you quickly get through the adjustment period: start with simple daily recording, temporarily put off large-scale migration; use Inbox to gather scattered items and build a lightweight personal homepage; treat Databases as tools rather than goals, first use Notion as a great editor. After reading, you can establish a sustainable usage rhythm, avoid unnecessary trial and error, and let Notion truly serve you. Recommended reading:
5 Tips to Get Through Notion Beginner Adjustment Period Faster
Use 5 practical tips to help you quickly get through the adjustment period: start with simple daily recording, temporarily put off large migration; use Inbox to gather, build lightweight homepage; treat Databases as tools rather than goals.
21notion.com
## FAQ * What to do if verification code is not received? * First check your email's \[Spam] or promotions category; if still not received, try again later or switch to a commonly used email (such as Gmail/QQ email). * For more beginner questions, please refer to [Notion Beginner FAQ](/docs/faq/before-purchase) --- # Quick Start (https://21notion.com/en/docs/quick-start) ## Three Basic Tips Whether you're using Notion or any new note-taking software, I recommend following these three tips: 1. Don't immediately migrate your old notes. Because you're not yet familiar with the new software's logic, blindly importing a large number of old notes will only make your new system chaotic from day one. 2. Don't immediately change your workflow. Don't expect a new tool to be fully effective from day one. The correct approach is gradual change. For the first three days, only use Notion to record new tasks and notes, then gradually expand usage scope in the first week. 3. Don't immediately fill in lifestyle modules. Although the Template presets 5 types of lifestyle interest recording modules, filling in this information requires little thinking cost, but the timing is wrong. If you're fighting on both work and life fronts simultaneously, your energy will be severely scattered. ## How to Start After Purchase ### Watch Template Intro Video I spent 1 month creating a comprehensive intro video for this Template. I strongly recommend all Template users browse through it before using to better understand the Template's design philosophy and basic workflow. ### Read Design Documentation I also wrote a comprehensive article for this Template that introduces in detail the Template's underlying logic in text and images. Article link: ["Rethinking Notion, My Seven Years of Reflection"](/blog/notion-7-year-reflection) ![](https://pic.eryinote.com/PicGo/202509091531375.webp) ### Understand Notion's Basic Design I created a comprehensive Notion system review 3 years ago. Although Notion has had many updates since then, this video still gives you a basic understanding of Notion. ### More Getting Started Tips If you're new to Notion, I recommend reading this article to follow steps and avoid pitfalls: [5 Tips to Get Through Notion Beginner Adjustment Period Faster](/blog/notion-beginner-5-tips) --- # Template Import (https://21notion.com/en/docs/template-import-guide) This document will guide you through the complete Template import process so you can quickly start using the FLO.W Template. ## Template Import ### Video Tutorial I've prepared a detailed video tutorial to help you quickly master the Template import method: ### Illustrated Tutorial After successful payment, you will receive a Template link. Enter the Template link in your browser's address bar (Chrome or Edge recommended), then press Enter ![](https://pic.eryinote.com/PicGo/202509121536910.png) Click the Template duplicate button in the top right corner ![](https://pic.eryinote.com/PicGo/202509121536034.png) Click the "Add to Private" button (or add to private section) to duplicate the Template to your Notion library ![](https://pic.eryinote.com/PicGo/202509121536769.png) ### Template Duplication Failed If you encounter an error when duplicating the FLO.W Template, don't worry. This doesn't mean the Template has a problem, but rather that Notion occasionally has some "unexpected situations" when duplicating very large Templates. Since the Template contains a lot of content, Notion will pull data gradually during duplication, which may take a bit longer. Therefore, if the first duplication fails, you can try these 3 methods: 1. Wait about 1 hour before trying again; don't duplicate multiple times in a short period 2. Network environment affects duplication speed. You can try using [Notion Faster](/docs/notion-download#notion-access-speed) to optimize loading, which is usually smoother 3. Create a new workspace, then duplicate to the new space. Specific method 👉 [Click Here](https://leon21.notion.site/25b0e68aa046807785b6cf9e8f3aa91d) ### Cannot Duplicate Template If after trying the above methods, Template duplication still fails, you can provide feedback through the following channels, and I'll respond as soon as possible: 1. Send email feedback: [eryidebiji@gmail.com](mailto:eryidebiji@gmail.com) 2. Fill out form feedback: * [Notion Form](https://www.notion.so/25b0e68aa04680df8500fcf63ec131df?pvs=21) * [Lark Form](https://h9ttbgjzk5.feishu.cn/share/base/form/shrcnADpGNsH19tYTlnnVjt0vpb) ## Old Notes Migration The best way to use the FLO.W system is to start recording from scratch, giving yourself a fresh start. Keep your old note data in its original location, review if necessary, and when you feel something is truly important enough, migrate it to the FLO.W system. If you're certain you want to migrate old notes, please refer to the following methods. The FLO.W system is absolutely centered around Databases, with all pages uniformly stored in Databases. However, different types of pages (such as Tasks, Projects, Notes, etc.) belong to different Databases. You can find the centralized Database page entries in the "Databases" module of the homepage navigation. ![](https://pic.eryinote.com/PicGo/202509121558942.png) This means the basic logic for migrating pages is: 1. Confirm what type of Notion page you want to migrate 2. Move it to the corresponding type of Database ### Migrate Scattered Pages Suppose you have several scattered **Task pages**. You can select all these pages, then click the function button in the top left corner, and use the "Move to" function to move these pages to the "**FLO.W Task Management DB**" Database ![](https://pic.eryinote.com/PicGo/202509121559675.webp) ### Migrate Database Pages *** Since Database pages have Properties, when you migrate pages from an **old Database** to a **new Database**, the new Database will automatically add corresponding Properties to accommodate these property values. For example, in the GIF below, "Database 01" has a "Date" Property, while "Database 02" doesn't. When I move a page to "Database 02", you'll see it automatically adds a Date Property: ![](https://pic.eryinote.com/PicGo/202509121600469.gif) Therefore, before migrating Database pages, **here are 3 important recommendations - please read them completely:** 1. Clean up old Database Properties before moving pages to remove unnecessary property information, avoiding making FLOW's Database Properties too cluttered. 2. If some Properties must be kept and FLOW Database also has **the same type** of Property, you need to first rename the old Database Property to match FLOW's, then move. This way FLOW's Database won't add extra Properties. For example, if both Databases have a "**Date**" type Property, the old Database calls it "Task Time" while FLOW Database calls it "Task Schedule Date", then you need to first rename "Task Time" to "Task Schedule Date" before moving. 3. Recommended to familiarize yourself with the FLOW system before migrating pages, to avoid the situation where you can't find your notes after migration ### Batch Migrate Database Pages Before batch migrating Database pages, please first migrate scattered pages to test if the entire process works properly. Confirm everything is correct before proceeding to the next step. Otherwise, if the Database page structure is damaged, it will be very difficult to recover. --- # Test Heading ID (https://21notion.com/en/docs/test-heading-id) ## Test Heading 1 ## Test Heading 2 --- # Update Log (https://21notion.com/en/docs/updates) import { TimelineContainer } from '@/components/docs/timeline-container' import { TimelineUpdateCard } from '@/components/docs/timeline-update-card' This page tracks FLO.W template documentation updates. For official Notion feature updates, visit the [Notion Updates Timeline](/notion-updates). --- # Use Case Index (https://21notion.com/en/docs/use-cases) import { BookOpen, Briefcase, Heart, Users, Zap, Calculator, Settings, Wrench, PenTool, Target, Home, TrendingUp, Globe } from 'lucide-react'; import { ComingSoonCard } from '@/components/ComingSoonCard'; Welcome to the FLO.W practical application case page! This shows how to use FLO.W in different scenarios to improve efficiency and management capabilities. > 💡 **Important Note**: All the following application scenarios can be perfectly achieved with the FLO.W Template! The Template features are very comprehensive, sufficient to support these complex usage needs. We are currently updating detailed practical tutorials to help you quickly master specific operation methods. Usually, using it for 3 days is enough to proficiently master all core features of the Template. ### Learning & Self-Improvement } title="Course Learning" href="/blog/course-learning"> From hearing to doing, knowledge not forgotten } title="Reading Notes" href="/blog/book-reading"> From excerpts to reviews, internalize for yourself } title="Exam Preparation" href="/blog/exam-preparation"> Plan review rhythm, track knowledge blind spots } title="Skill Mastery" href="/blog/skill-mastery"> Build skill tree, quantify your growth ### Content & Creation } title="Content Creation" href="/blog/content-create"> From inspiration to draft, smooth workflow } title="Influencer Career" href="/blog/influencer-career"> Build your influencer career from scratch, plan it like a business } title="Launch a Column" href="/blog/paid-newsletter"> Plan paid content, build personal brand ### Career & Development } title="Job Search" href="/blog/job-hunting"> Track interview progress, land your dream company } title="Annual Review" href="/blog/annual-review"> Quantify work performance, have more confidence in performance reviews } title="Start a Side Hustle" className="opacity-50"> Coming Soon: From idea to execution, organized throughout the process ### Projects & Coordination } title="Renovate a New Home" href="/blog/home-renovation"> From budget to construction, full control and peace of mind } title="Organize an Event" className="opacity-50"> Coming Soon: Coordinate complex items, no more missed details } title="Develop a Product" className="opacity-50"> Coming Soon: Agile iterative development, record user feedback } title="Lead a Team" className="opacity-50"> Coming Soon: Assign task objectives, efficient team collaboration } title="Operate a Community" className="opacity-50"> Coming Soon: Establish SOP, accumulate operational experience ### Lifestyle & Planning } title="Plan a Trip" href="/blog/travel-planning"> From budget to travelogue, full control without worry } title="Set Annual OKRs" className="opacity-50"> Coming Soon: Break down life goals, every step counts } title="Execute a Fitness Plan" href="/blog/fitness-goal"> Project + habit collaboration, linking goals with actions } title="Personal Health Management" href="/blog/disease-tracking"> Track daily data, manage diseases and chronic conditions } title="Develop a Hobby" className="opacity-50"> Coming Soon: Track interest moments, document your passion --- # Automation Tutorial (https://21notion.com/en/docs/advance-feature/automation) ## Description All Database automations listed on this page require a paid Notion subscription. ![](https://pic.eryinote.com/PicGo/202510302126991.png) ## Task-related Automation **Effect Description** When creating a \[Task] in the Task Database within \[Project], automatically relate that \[Task] to the \[sub-Area] that the \[Project] belongs to. **Implementation** 1. Find the automation settings for the Task Database ![](https://pic.eryinote.com/PicGo/202510302126387.png) 2. Create an automation action as shown in the image **Set Trigger** ![](https://pic.eryinote.com/PicGo/202510302127240.png) **Add Action - Define Variable** As shown in the image, name the variable "Project's sub-Area" ![](https://pic.eryinote.com/PicGo/202510302114287.png) **Add Action - Edit Property** ![](https://pic.eryinote.com/PicGo/202510302116488.png) Then find the \[sub-Area] property, click it, and select \[Custom Formula] from the pop-up menu ![](https://pic.eryinote.com/PicGo/202510302117225.png) Then in \[Custom Formula], find and click the variable "Project's sub-Area" you just defined, then click close ![](https://pic.eryinote.com/PicGo/202510302118187.png) The complete flow is shown in the image below. After confirming everything is correct, click the "Enable" button ![](https://pic.eryinote.com/PicGo/202510302120112.png) Note that to implement this automation flow, the Project must first be related to a sub-Area. If when you create a Task, the Project is not related to a sub-Area, automatic relation cannot be achieved, or rather the automation has been triggered but because the "Project's sub-Area" variable is empty, the Task's sub-Area will also be empty. --- # Formulas and Reports (https://21notion.com/en/docs/advance-feature/formula) More content coming soon... ## Frequently Asked Questions ### Formula Statistics Report Error In the FLO.W system, I have built in many automated statistical formulas ![](https://pic.eryinote.com/PicGo/202509142120390.png) But sometimes you may find that after adding a new Task (or Note), the corresponding statistical data has not changed. If this happens, it could be due to the following reasons: 1. When saving the FLO.W Template, Notion did not successfully create a relation between Tasks and the statistical formula 2. Pages created through certain methods are not related to the corresponding formula statistics page To solve this problem, we have three methods. **Method 1: Manually Relate Formula Statistics Page** For example, below is a newly created \[Note] page. You can check if its \[Relation Report] property is blank. If so, please click this property and manually relate it to the \[FLO.W - Note Report] page. ![](https://pic.eryinote.com/PicGo/202509142154591.png) **Method 2: Manually Click the Relation Button** You can find the button shown below in each report page. After clicking, you can relate "all Tasks" to the "statistical formula", which will give you correct statistical results. ![](https://pic.eryinote.com/PicGo/202509142139865.webp) **Method 3: Edit Template, Create Default Relation** After executing the operations in the video above, all Tasks you create thereafter will automatically be related to the Task statistics formula. If you find that statistical formulas for other Databases are also incorrect, you can edit the Database's default template in the same way. --- # iPhone Shortcuts (https://21notion.com/en/docs/advance-feature/iPhone-Shortcut) import { Accordion, Accordions } from 'fumadocs-ui/components/accordion'; {/* [IN]: Notion API, iOS Shortcuts App [OUT]: iOS Shortcuts configuration guide [POS]: Advance feature documentation for mobile productivity Protocol: Update this header comment and the folder's .folder.md when modifying this file */} ## Description 1. All shortcuts listed on this page currently only support iPhone 2. Shortcuts are currently only available to \[Pro Edition] and \[Advanced Edition] users > **2026 Update**: Notion now has [official mobile voice input](/notion-updates/mobile-voice-input) for direct speech-to-text in the app. The Shortcuts approach on this page still has unique advantages — AI processing and custom database targeting. ## Voice Quick Note Shortcut ### Demo First activate the shortcut on iPhone, then speak directly what you want to record ![](https://pic.eryinote.com/PicGo/202601111711201.png) This shortcut will automatically perform the following operations: 1. Transcribe voice to text 2. Process the text with DeepSeek API to add appropriate punctuation based on semantics 3. Store the text from step 2 into the Notion Database The voice note effect is as follows ![](https://pic.eryinote.com/PicGo/202601111712195.webp) Next, let's go a bit further. Since we have already stored the voice in text form in the Notion Database, based on the powerful Database features, we can use Database Buttons to convert the current voice note into a formal Note with one click, or quickly convert it into a Task. ![](https://pic.eryinote.com/PicGo/202601111712791.png) I can create a "Convert to Task" button. Its operation logic is shown below: ![](https://pic.eryinote.com/PicGo/202601111713037.png) Clicking this button will execute the following flow: 1. Create a new page in your Task Database 2. Store the text transcribed by the shortcut into the Task's remarks property 3. Open this newly created Task page ![](https://pic.eryinote.com/PicGo/202601111713406.png) Now that we've covered the effects and logic, let me teach you how to deploy your own shortcut. ### Configuration Tutorial ### 1. Get Notion Database ID 1. Find the FLO.W Template's [Quick Note Database](/docs/basic-feature/note-taking#quick-note-logic) 2. Confirm that the current property name is \[Quick Note Content]. If it is \[Note Content], please change it to \[Quick Note Content] 3. Enter the source Database as shown below ![](https://pic.eryinote.com/PicGo/202601111715167.png) 1. Use the shortcut Ctrl+L (or CMD+L) to get the Database link. 2. This link format is generally: `https://www.notion.so/yourworkspace/xxxxxxxxxxxxxxxxxxxxx?v=...` 3. Get the code xxxxxxxxxxxxxxxxxxxxxx **before the question mark**, which is the Database ID 4. Save this Database ID, it will be useful later ### 2. Create Notion Account API Key 1. Visit [Notion Integration](https://www.notion.so/profile/integrations) and log in to your Notion account 2. Create a new integration, you can customize the name, relate it to your Notion workspace, then click the save button in the bottom right corner ![](https://pic.eryinote.com/PicGo/202601111715006.png) 1. Click "Configure integration settings" to get the "Internal Integration Secret" Click the show button to copy this secret. Remember to save this secret, it will be useful later. The secret format is similar to: `ntn_b386784XXXXXXXXXXXXXXXXXX` ![](https://pic.eryinote.com/PicGo/202601111715691.png) 2. Relate this integration to the Quick Note Database As shown below, re-enter the **source Database** of the Quick Note Database ![](https://pic.eryinote.com/PicGo/202601111716806.png) Then as shown below, relate the \[Integration] you created to this source Database ![](https://pic.eryinote.com/PicGo/202601111716411.png) ### 3. Apply for SiliconFlow API For specific tutorial, see this article: "[DeepSeek R1 Free Usage Tutorial](https://eryinote.com/post/1749)". In this step, you should obtain the following two things: 1. SiliconFlow API, format similar to: `sk-ddguwXXXXXXXXX` 2. The model name you want to set, format similar to: `deepseek-ai/DeepSeek-V3`. The model name in this step can be freely chosen, it doesn't have to be DeepSeek, but **don't use reasoning models like R1** > **⚠️ Important reminder**: After obtaining the API Key, please make sure your SiliconFlow account has **a positive balance** (even a small top-up works). The free granted quota may not support the API calls required by this shortcut. The "execution failed" error that many users encounter is usually caused by an empty balance. Save these two things, they will be needed in later steps. ### 4. Get and Configure Your Shortcut 1. Save the iPhone shortcut template I created. It is currently only available to \[Pro Edition] & \[Advanced Edition] users. Please get the shortcut link in \[Lark Group Announcement] or \[Discord Related Channel] 2. Follow the prompts in the shortcut to modify the parameters in the four places shown below. Please replace the string "Enter XXXXX here", do not modify any other content ![](https://pic.eryinote.com/PicGo/202601111717839.png) The 4 parameters needed in the image above have been prepared in the previous steps. You just need to fill them in in order. Please note that you need to delete my remark information first, then fill in your personal information in the box. If everything is filled in correctly, you can now activate this shortcut and use voice to record notes. ## Frequently Asked Questions **Recommended to record within 1 minute.** Since the transcription process involves not only Notion but also interaction with AI large models, recording for too long may cause transcription failure or unexpected results. **Note:** * Voice quick note is only suitable for quickly recording short, scattered ideas or inspiration. * **Not suitable** for scenarios requiring long recording such as meeting minutes * If you need meeting recording functionality, it is recommended to subscribe to Notion Business plan, which comes with AI Meeting voice recording functionality for a better experience. Please troubleshoot step by step: 1. **Check basic information**: Please strictly follow the process to ensure that the ID, Token, and model name filled in each step are completely correct. 2. **Check Database relation**: Check if the created Integration is related to the corresponding Database. 3. **Check API configuration and balance**: * Ensure the SiliconFlow model name is filled in correctly. * **Do not use R1** or other reasoning models. You can try this model first: Pro/deepseek-ai/DeepSeek-V3 * Ensure your SiliconFlow account has a certain balance (**not free granted quota**, because granted quota may not support certain models or API permissions). **Most common error**: If running the shortcut fails with a request error to `https://api.siliconflow.cn/v1/chat/completions`, or the result shows "failed", **90% of the time it's because your SiliconFlow account has no balance**. Please log in to the SiliconFlow dashboard to top up and try again. --- # Notion AI (https://21notion.com/en/docs/advance-feature/notion-ai) import { Card } from 'fumadocs-ui/components/card'; FLO.W Template is highly compatible with Notion Agent's powerful features. Through structured Database design and clear information architecture, AI can accurately understand and process your work content. ## Perfect Notion Agent Compatibility 🤖}> Deep dive into Notion Agent's design philosophy, feature boundaries, and practical scenarios ### Why is FLO.W Extremely Compatible with Notion Agent? **1. Structured Database Design** * Tasks, Projects, Notes, and Clips each have independent storage locations * Clear Property design and semantic tag system * Agent can accurately understand the purpose and meaning of each Property **2. Clear Information Boundaries** * Agent knows where to read information (input boundary) * Agent knows where to save results (output boundary) * Avoids aimless AI searching in the workspace **3. Scenario-based Workflow Support** * Each Database corresponds to specific work scenarios * Supports "keyword trigger + sub-document execution" mode * Can achieve complex automated workflows ### Practical Application Scenarios With FLO.W Template's structured design, Notion Agent can easily achieve: * **Automatic Weekly Report Generation**: Read this week's completion status from Task Database * **Intelligent Task Management**: Batch process Task priorities and statuses * **Automatic Content Classification**: Automatically categorize new Notes into appropriate tags * **Project Progress Tracking**: Automatically analyze progress status of Project Database For more practical usage, please refer to our [Complete Notion Agent Guide](/blog/notion-agent-complete-tutorial). Notion's AI capabilities are evolving rapidly, with new models, MCP protocol support, custom skills, and more. See [Notion AI Updates](/notion-updates?tag=AI) for the latest. --- # Notion Button (https://21notion.com/en/docs/advance-feature/notion-button) Content being updated... --- # Area Organization (https://21notion.com/en/docs/basic-feature/area) import { Target } from 'lucide-react'; import { File, Folder, Files } from 'fumadocs-ui/components/files'; This document will help you understand the Area concept in the FLO.W Template and learn how to divide and manage different work and life Areas. In the previous tutorials, whether it's tasks, notes, or projects, they're all relatively intuitive, concrete, and common concepts, but the Area concept that follows is not as common and easy to understand, so it may require some patience and thought from you. Note: The Area concept comes from Tiago Forte's PARA methodology. ## Area Basic Structure } title="Area Properties" href="/docs/properties/area#area-properties-explanation"> Understand the meanings of Area Goal, Description, Core Directions and other Properties First, we can simply and crudely understand Areas as larger folders, which are collections of a series of Projects. That is, in the FLOW system, their hierarchical structure is like this: However, in long-term practice, I've found that Areas themselves must continue to be subdivided to better associate with Projects. I'll explain the specific reasons in other tutorials. For now, please remember that in the FLOW system, their hierarchical structure is like this: Below are some reference cases: | **Area** | **sub-Area** | **Project** | **Task** | | ------------------ | ------------------------- | ----------------------------------------- | --------------------------------------------------- | | Channel Operations | Bilibili | Create Notion Review Video | Write draft | | | | | Record audio | | | | | Shoot | | | | | Edit | | | | | Upload | | | Xiaohongshu | Create Notion Graphic Posts | Topic planning | | | | | Write graphic content | | | | | Create cover image | | | | | Publish and engage | | | | Create Lifestyle Scenario Note Posts | Collect lifestyle materials | | | | | Create template screenshots | | | | | Write copy script | | | | | Publish and track data | | Programming Skills | Backend Development | Develop Payment API for E-commerce Site | Design order Database model | | | | | Implement Alipay interface integration | | | | | Write API documentation | | | | | Complete unit testing | | | Data Analytics | Analyze Q2 2025 User Purchase Behavior | Clean June sales data | | | | | Generate user persona report | | | | | Create interactive sales charts | | | | | Submit decision proposal | | Health Management | Physical Training | Complete 2025 Half-Marathon Training Plan | Wednesday 5km run training | | | | | Buy suitable running shoes and gear | | | | | Create nutrition supplement plan | | | | | Participate in July 15 city half-marathon race | | | Diet Adjustment | Implement Low-Carb High-Protein Diet Plan | Create weekly meal plan | | | | | Prepare healthy snack alternatives list | | | | | Learn 3 high-protein low-calorie recipes | | | | | Record daily diet log and analyze | | Family Life | Parent-Child Relationship | Cultivate Child's Reading Habits | Read 20 minutes before bed | | | | | Take child to library once | | | | | Set up age-appropriate bookshelf for child | | | | | Participate in July parent-child reading club event | | | Home Environment | Create Efficient Home Workspace | Organize study space and add necessary furniture | | | | | Set up comfortable lighting system | | | | | Organize file storage system | | | | | Buy ergonomic chair and desk | ## Area Definition ### How to Define Areas When establishing your Areas, I usually suggest starting with "few", focusing on 3-5 sections you value most. Don't stuff everything into the system from the start, as it can easily make you feel lost. Observe what you've been spending time on recently - those things you continue to invest energy in daily or weekly are likely your most real and active Areas. Of course, we don't just look at the present, but also anticipate where you hope to grow, maintain, or improve in the next 1-3 years, because the essence of Areas is systematic maintenance zones serving the long term. For naming, suggest using nouns or gerunds, like "Health Management" or "Content Creation", rather than one-time goals like "Lose Weight Successfully" or "Finish a Book". Maintaining an open, continuous state is very important. Also confirm whether there are really responsibilities and actions in this Area that need long-term maintenance - if it's just a vague idea, or there's no clear investment plan yet, then it might just be a future Project, not a current Area. As for how to classify, there's no fixed answer. Some like to separate work and life, others prefer to integrate them into capability or identity modules. The key is what feels clear and natural to you. You can also reference the common six categories: health, wealth, career, relationships, learning, leisure, but don't forget to combine with your reality and transform them into expressions close to your life. Areas aren't set in stone - they should flexibly change with your life rhythm, constantly being adjusted, reduced, or renamed. Don't worry too much about defining them perfectly at the start. Use them first, then let them gradually take shape through action and review. ### How to Define sub-Areas When you've clarified your Areas, the next step is to break them down into reasonable sub-Areas. The core of this step is to "cut" large responsibilities into smaller pieces, but not arbitrarily - rather, based on **different roles you play in that Area, different strategies you adopt, or specific affairs you face** as clues to divide into several relatively independent small blocks. If your Area is "Channel Operations", you might divide into sub-Areas like "Bilibili", "Xiaohongshu", "Official Account" by platform; under "Health Management", you can set "Physical Training" and "Diet Adjustment"; in "Programming Skills", it might be subdivided into "Backend Development" and "Data Analytics". In my practice, sub-Areas are actually the main battlefield of your daily work and life, because they will directly associate with Projects. ### How to Create Areas ## Create Area Milestone ### Feature Location As shown in the image below ![](https://pic.eryinote.com/PicGo/202601111828390.png) ### Design Logic **What problem does this feature solve?** In the process of long-term deep dive in an Area, we easily fall into a state of "only keeping our heads down working, not looking up to see the road" - completing tasks and advancing projects every day, but rarely stopping to celebrate our phased achievements. Over time, this creates a sense of confusion of "seemingly always working hard, but not knowing how far we've actually gone". The design intention of "Milestone" is to establish a **growth monument** for each sub-Area. It doesn't record daily trivial tasks, but those **milestone events** worth remembering - such as "Bilibili followers exceed 10,000", "Complete publication of first book", "Obtain certain professional certification". **Relationship with other features** * Relationship with sub-Area: Milestones are precisely anchored to specific subdivided directions through the "Relate to sub-Area" Property. This gives each Milestone a clear attribution, making it convenient to review growth trajectory by Area later. * Difference from Projects: Projects are "ongoing battles" with clear beginnings and ends; while Milestones are "earned badges", frozen records of certain achievements. The achievement of a "Milestone" may depend on the successful completion of multiple Projects. ![](https://pic.eryinote.com/PicGo/202601111904449.png) ### Common Misconceptions Clarified * ❌ Misconception: Milestones should record all completed things * ✅ Correct: Only record **those phased achievements truly worth celebrating**, maintaining scarcity preserves the sense of ritual ### Applicable Scenarios * Achieved quantifiable achievements in an Area (follower count, income, work count) * Completed an important "first time" (first public speech, first paying client) * Received external recognition (certificates, awards, media coverage) * Reached self-set phased goals ### Usage Suggestions * Recommended to review the Milestone list at least once a month - this is an effective self-motivation method * When creating Milestones, take the opportunity to write down "how I did it" in the page - these review contents have high future value * Can set calendar view to review your growth trajectory in timeline format --- # Homepage Navigation (https://21notion.com/en/docs/basic-feature/homepage) ## Homepage Layout Quickly understand the layout and features of the FLO.W Template homepage through video: ## Top Navigation Bar ### Navigation Bar Principle Understand how the navigation bar works in Notion Template: ### Move Navigation Bar Position Learn how to adjust and move the navigation bar position: ## Detailed Feature Modules in Navigation Bar In actual use, you may feel that the position of some modules is not satisfactory or appropriate enough. The following tutorial will teach you how to migrate feature module positions. ### Clarify Navigation Bar Structure First, in the FLO.W system, all feature modules are placed in the top navigation bar. For example, the specific project subdivision features circled in the red box below Expand the small triangle on the left side of "Project Navigation Bar", and you'll find that there are some identical pages inside the small triangle, as shown below Actually, this is where the detailed feature module "actual pages" (i.e., the page body) are stored, while the pages on the navigation bar are just a type of "page reference" ### Change Feature Module Position Now if I want to move the "Travel Plan" navigation bar to the "Lifestyle Module", what should I do? There are two approaches. import { Accordion, Accordions } from 'fumadocs-ui/components/accordion'; Directly use the @ symbol to reference the "Travel Plan" page in the navigation bar position of "Lifestyle Module" However, doing this will add a small arrow to the referenced page icon. So if you don't want this small arrow, please use "Method 2" below. Step 01: Move page to hidden position First move the "actual page" of "Travel Plan" to the hidden position of "Lifestyle" navigation bar **How to move the "Travel Plan" page?** 1. Enter the "Travel Plan" page 2. Click the three dots in the top right corner 3. Use the "Move to" function 4. Move the "Travel Plan" page to the "Lifestyle" page 5. After moving, you'll find "Travel Plan" is placed at the very bottom of the "Lifestyle" page 6. Drag "Travel Plan" to the "hidden position" in the top navigation bar Step 02: Reference the actual page Then use the @ symbol to reference the "actual page" of "Travel Plan" in the "Lifestyle" navigation bar position, so there won't be a small arrow --- # Note Management (https://21notion.com/en/docs/basic-feature/note-taking) import { FileText, Link, GitBranch, Users, FolderGit, Eye, Clock, Star, Shuffle } from 'lucide-react'; This document will teach you how to create, edit, and organize notes in the FLO.W Template to build your knowledge management system. ## Add a Note ## Note Properties Description Learn about the configuration and usage of various Properties in the note system: } title="Note Type" href="/docs/properties/note#note-types"> Six preset note types: Exp, Log, Ask, How, Idea, Ref } title="Outgoing and Incoming Links" href="/docs/properties/note#outgoing-incoming-links"> Build sense of direction and associations between notes } title="Parent and Child" href="/docs/properties/note#parent-child"> Create hierarchical structure and organization relationships for notes } title="Sibling Notes" href="/docs/properties/note#sibling-notes"> View related notes at the same level } title="Topic Notes" href="/docs/properties/note#topic-notes"> Manage topic content with child notes } title="Attention Level" href="/docs/properties/note#attention-level"> Mark note content that needs attention } title="Completion Level" href="/docs/properties/note#completion-status"> Track the lifecycle status of notes } title="Common Notes" href="/docs/properties/note#frequently-used"> Quick access and record common content } title="Random Sort" href="/docs/properties/note#random-sort"> Randomly review note content ## Create Notes in Tasks ## Diary Creation Methods ### Diary Storage Location Follow the path shown below, access the Template navigation bar, and enter the diary module. This will centrally store all diaries you create ![](https://pic.eryinote.com/PicGo/202511111952993.png) If you want your created "Diary" to appear in this Database, please ensure your title includes the word "Diary". ![](https://pic.eryinote.com/PicGo/202511112001855.png) ### Diary Definition According to the [Note Type](/docs/properties/note#note-types) definition, "Diary" belongs to the "Log" category. Diaries are used to simply and directly record daily experiences or feelings. They don't need deliberate refinement and summary, only to authentically capture the "moment". Their value lies in preserving unadorned records, providing material for future review, reflection, or simple reflection. ![](https://pic.eryinote.com/PicGo/202509130208939.png) ### Diary Creation Methods Please note that in the 3 methods below, the description of "Note" specifically refers to "Notes" that exist in the "Note Database"

Method 1: Create through process

Follow the process shown below to create a "Diary".

Create diary process

Method 2: Title keyword

Add the word "Diary" to the "Title" of any "Note", and it will appear in the "Diary Database"

As shown below, this Database has set a filter condition of "contains Diary" for "Title"

Diary Database filter

Method 3: Activate diary template

In the "Note Page", activate the "Diary Template"

Diary Template

If you don't see the "Diary Template" shown above in the "Note Page", please refer to this solution: Template not showing

### Modify Diary Template Method The current preset diary template is shown below with a relatively simple structure. ![](https://pic.eryinote.com/PicGo/202511111918769.png) If you want to modify this diary template, you can refer to this instruction: [How to modify Database default template](/docs/faq/customization#template-default-edit) ## Periodic Review ### Review Note Definition In the FLO.W system, "Review Notes" are notes with [Note Type](/docs/properties/note#note-types) as "Exp", so theoretically you don't actually need to create a separate so-called "Review Module", because any note you mark as "Exp" type can become a review note. ![](https://pic.eryinote.com/PicGo/202511111801012.png) However, to make it more convenient for you to create and manage review-related notes, and improve the efficiency of the "Periodic Review" action, I've added a "Review" button in the homepage navigation bar. Clicking it will take you to the "Review Center". ![](https://pic.eryinote.com/PicGo/202511111913287.png) ### Periodic Review - Diary The creation method for [Diary](/docs/basic-feature/note-taking#create-diary) has been introduced in detail earlier, so I won't repeat it here. From an information type perspective, diaries are "Log" type raw records, while weekly review and monthly review are "Exp" type experience refinements. Putting them in the same module also conveys a philosophy: **recording and reflection form a complete closed loop**. You can only keep diaries without reviewing, or only do reviews without keeping diaries, but when you combine both, "Log" in diaries has the opportunity to be refined into "Exp" in reviews, forming higher-density personal insights. ![](https://pic.eryinote.com/PicGo/202511111915936.png) ### Periodic Review - Weekly Review In the "Review Center - Weekly Review" Database, create a new page to activate the "Weekly Review" template, and the preset template content shown below will appear: ![](https://pic.eryinote.com/PicGo/202511111945249.png) You can centrally review tasks and projects completed in **this week**, notes, clips, movies watched, and even items purchased in **this week** in "This Week Overview" ![](https://pic.eryinote.com/PicGo/202511112007920.png) Taking this week's tasks as an example, this filters out "tasks completed this week" through preset filter conditions. So every time you activate the "Weekly Review" template, you can only see this week's completed tasks, not last week's. ![](https://pic.eryinote.com/PicGo/202511112015837.png) But some users may be accustomed to reviewing the previous week's content on every Monday (new week). Based on the preset conditions above, they can only see this week's tasks, not last week's. So the key here is how to add a new filter view in the "Weekly Review" template to also filter out "tasks completed last week". Since Notion's filter conditions don't have a "Last Week" filter condition, only "Last 7 Days", the following steps will be somewhat tortuous. The specific method is as follows:

Step 1: Understand default template modification

First you need basic knowledge: How to modify Database default template .

Step 2: Create filter view

Find the "Weekly Review Template" and create a new filter view in the "This Week Tasks" Database to filter out "tasks completed this month".

Create filter view example

Step 3: Group by week

Group by "Completion Date" and set the grouping unit to "Week", referring to the conditions in the image below.

Group by week conditions

Step 4: View results

This way, when you activate the "Weekly Review" template, you can view the task completion status for each week of this month in the "This Month Completed" view.

View result example

Step 5: Need help?

If you're not familiar with the above steps, you can ask questions in the Lark group . To get faster and more accurate answers to your questions, please explain in detail the specific step you've reached and include images to explain your question, so you can get help faster.

### Periodic Review - Monthly Review The implementation logic of monthly review is similar to weekly review, just changing the grouping unit from "Week" to "Month", so I won't go into too much detail. If you have questions, you can also ask and exchange in the Lark group. ![](https://pic.eryinote.com/PicGo/202511112103549.png) ## Quick Note Module Usage Logic ### Basic Usage The feature location of the quick note module is shown below: ![](https://pic.eryinote.com/PicGo/202512191811596.png) You can click the "Add Quick Note" button, then record in the popup sidebar ![](https://pic.eryinote.com/PicGo/202512191812204.png) But it's more recommended to directly click the "New Page" button, then quickly enter in the "Quick Note Content" property ![](https://pic.eryinote.com/PicGo/202512191814399.png) ### Convert Quick Note to Note After opening the quick note page, you'll see there are two buttons like this ![](https://pic.eryinote.com/PicGo/202512191815598.png) Taking the "Convert to Note" button as an example, after clicking, it will create a "Note Page" and copy the content from the "Quick Note Content" property to the "Remarks" property of the "Note Page": ![](https://pic.eryinote.com/PicGo/202512191818020.png) That is, you can use the "Quick Note" feature to capture some unformed, random inspirations or ideas. When inputting, you don't need to think about whether it's complete or how to categorize it. Then you can choose a fixed time to organize all quick note content. If you think a certain "Quick Note" has value for continued improvement, click the "Convert to Note" button to migrate these fragmented thoughts to the more fully functional "Note Page". Also note that the "Convert to Note" button can only migrate information from the "Quick Note Content" property, not information below the "Quick Note" page ![](https://pic.eryinote.com/PicGo/202512191821031.png) ### Convert Quick Note to Task The basic logic of "Convert to Task" is the same as "Convert to Note", so I won't repeat it here. ![](https://pic.eryinote.com/PicGo/202512191822328.png) ### Copy Quick Note Button to Other Places First, the "Quick Note" button exists in two places: one is the "Homepage", and the other is the "Note Module - Quick Note Page" demonstrated earlier. If you want this button to be placed in other pages, just copy this "Add Quick Note" button and paste it anywhere else. ![](https://pic.eryinote.com/PicGo/202512191825199.png) --- # Project Management (https://21notion.com/en/docs/basic-feature/project-management) This document will guide you on how to create, configure, and manage projects in the FLO.W Template to achieve efficient project management. ## How to Add a Project ## Task vs Project: How to Choose Correctly When using the FLO.W Template, many users wonder: when should I create a project, and when do I just need to record a task? Understanding the difference between the two is key to efficient management. ### Concept Understanding **Tasks** are like each specific action in cooking - washing vegetables, cutting meat, stir-frying, eating, washing dishes. Each action is very specific, you don't need to break it down further, just execute directly. **Projects** are like "hosting a dinner party", requiring menu determination, guest invitations, ingredient shopping, cooking, table setting, party game preparation, etc. It has a clear endpoint, but requires a combination of a series of tasks to achieve. ### Three Judgment Criteria #### 1. Do You Need to "See Progress" This is the most important judgment basis. If you often ask yourself "When will this be done? How much more is needed?", then you need more than just individual task completion prompts, but overall progress visualization. **Suitable for creating projects:** * Preparing Double 11 event materials (need to care about overall progress of copy, posters, channel docking) * Product feature iteration (need to track design, development, testing stage progress) **Suitable for recording as tasks:** * Sending an email to contact a KOL (complete upon execution, no progress bar needed) * Updating a document (single action, no breakdown needed) #### 2. Are You "Making a Checklist" When you think of something, if you start thinking "I need to do A first, then B, and also C", then it's a project. If you just think "go do this thing", without the impulse to automatically break it down, then it can be a task. **Tip:** When 5-6 tasks pointing to the same goal appear in the task list, this is reminding you that it's time to integrate them into a project. #### 3. Do You Need to Review After Completion If after completing something, you feel it's necessary to summarize experience, refine methodology, or analyze problems, then it deserves to be a project. Projects have clear boundaries and complete process records, making them the most suitable granularity for review. **Typical review scenarios:** * Planning marketing campaigns (analyzing what worked and what didn't) * Completing product iterations (summarizing development process and improvement points) * Organizing team training (evaluating training effectiveness and methods) ### Practical Suggestions #### When Unsure, Prioritize Creating Project When you can't determine, suggest creating a project first. The project page can serve as a "chaos buffer", you can first put related tasks, ideas, and materials into it, without worrying about whether it's perfect. If you later find the matter is simple, you can: * Directly delete the project page (notes and tasks within won't be affected) * Mark the project as completed and archive, retaining the attempt record #### Allow Adjustments and Trial & Error This system allows you to flexibly adjust: * Tasks can be upgraded to projects * Projects can be simplified to tasks * No information will be lost due to adjustments #### Develop Judgment Intuition After using for a while, your intuition will become more and more accurate. At first you may need occasional adjustments, but gradually you'll be able to accurately judge whether to use tasks or projects at the moment of recording, because your brain has internalized this judgment logic. **Core Principle:** Rather than spending time struggling with "should this be a project or not", it's better to start practicing. The system's flexibility ensures you can adjust anytime without losing information. --- # Task Management (https://21notion.com/en/docs/basic-feature/task-management) import { Calendar, ArrowRight, Trash2, Bell, CheckSquare as CheckSquareIcon } from 'lucide-react'; This document will guide you on how to create, edit, and manage tasks in the FLO.W Template to improve your work efficiency. ## Task Creation Methods Quickly understand how to create and manage tasks through the following video: ## Task Properties Description Learn about the property configuration and usage of the Task Database: } title="Difference Between Schedule and Todo" href="/docs/properties/task#schedule-vs-todo"> Understand the difference between fixed-time schedules and deadline-based todos } title="Next Action" href="/docs/properties/task#next-action"> Set immediately executable next actions for tasks } title="Task Cleanup" href="/docs/properties/task#task-cleanup"> Filter and clean up tasks without Schedule Date or value } title="Task Reminder" href="/docs/properties/task#task-reminder"> View reminder logic and common issue descriptions } title="Task Status Property Usage Guide" href="/docs/properties/task#status-guide"> Understand how to use each status in the task lifecycle ## Add Daily Recurring Tasks ### What Are Recurring Tasks Recurring tasks are fixed items that need to be executed periodically. Notion can automatically create these tasks according to the frequency you set. **Common Scenarios**: * Work: Daily standups, weekly reports, data entry, etc. * Life: Exercise, reading, vocabulary review, cleaning, etc. ### Create Recurring Tasks

Open the Task Template Menu

Find "My Tasks DB", click the small arrow ▾ next to the "New" button in the upper right corner.

![Open template menu](https://pic.eryinote.com/PicGo/01-en.webp)

Create a Task Template

Click "New template" to enter the template editing page. Set up the template content here:

After editing, click anywhere blank to close the template editing page.

Set Up Recurring Generation

Click the small arrow ▾ next to "New" again, find the template you just created (e.g., "Daily Exercise"), and click the button on its right.

![Open template settings](https://pic.eryinote.com/PicGo/02-en.webp)

Configure Generation Frequency

Set the repeat cycle in the popup interface, for example:

![Configure generation frequency](https://pic.eryinote.com/PicGo/03-en.webp)

Once configured, Notion will automatically create tasks at the frequency you specified.

If your task doesn't need to be linked with other FLO.W modules, you're done at this step. ### Link Recurring Tasks to Projects If your recurring task belongs to a specific goal (e.g., "Daily Exercise 30min" belongs to the "Lose 5kg" project), you can preset the project relation in the template. **Method**: Select the corresponding project in the "Related Project" property of the task template. ![Link project in template](https://pic.eryinote.com/PicGo/04-en.webp) This way, each automatically created task will be linked to that project, and task completion will count toward project progress. ### FAQ Click "Tasks" in the top navigation bar to enter the Task Center, which contains "My Tasks DB". You can also find the task entry in the "Today's Todos" section on the Homepage. Click the small arrow ▾ next to "New", find the corresponding template, and click the `⋯` button on the right: * **Modify content**: Click "Edit" to modify the template content * **Modify frequency**: Directly adjust the repeat settings * **Stop generation**: Turn off the "Repeat" toggle, or delete the template directly Auto-generated tasks work just like regular tasks. You can: * Delete it directly * Change the status to "Abandoned" * Reschedule to another date This won't affect the next auto-generation. Recurring tasks will continue to be generated at the set frequency. It's recommended to regularly clean up completed or unnecessary tasks to keep your task list tidy. You can use the [Task Cleanup](/docs/properties/task#task-cleanup) feature for batch processing. ## Create Tasks in Notes ## Notion Calendar Integration ### Method Follow the operations below, click "Manage in Calendar", and the "Task Calendar" will open in Notion Calendar. ![](https://pic.eryinote.com/PicGo/202509121729793.png) This way, task todos you create in the "Task Database" will sync to Notion Calendar ![](https://pic.eryinote.com/PicGo/202509121725732.jpeg) If you find that tasks added in **Notion Calendar** are not syncing back to the **Notion app** after following the steps above, open Notion Calendar settings and check whether the correct **Notion workspace** is bound on the left side. If not, click "Add Notion workspace" to complete the connection. ![](https://pic.eryinote.com/PicGo/CleanShot%202026-04-16%20at%2015.20.22%402x.webp) ### FAQ Download link: [https://www.notion.com/zh-cn/product/calendar](https://www.notion.com/zh-cn/product/calendar) Open Notion Calendar settings ![](https://pic.eryinote.com/PicGo/202509121725312.png) 1. Notion Calendar can serve as a central hub 2. Can bidirectionally sync "Notion Database" with "Notion Calendar" 3. Can also bidirectionally sync "Apple Calendar" with "Notion Calendar" 4. But we currently cannot sync "Apple Calendar" through "Notion Calendar" to "Notion Database" 5. Here "Apple Calendar" can be replaced with "Google Calendar" Besides the solutions provided above, I haven't tried other tools or methods, so I can't answer this question currently. --- # Design Philosophy (https://21notion.com/en/docs/basic-feature/template-overview) This article comprehensively introduces the core design philosophy and implementation logic of the FLO.W Template, including tool selection philosophy, efficiency improvement methodology, and how to build a knowledge management system that suits you. Strongly recommend reading this article before using this Template: [📖 Rethinking Notion, My Seven Years of Reflection](/blog/notion-7-year-reflection) If you're a Notion beginner, recommend reading this article to understand the correct way to use Notion: [🚀 5 Tips to Get Through Notion Beginner Adjustment Period Faster](/blog/notion-beginner-5-tips) --- # Web Clipper (https://21notion.com/en/docs/basic-feature/web-clipper) import { Card } from 'fumadocs-ui/components/card'; import { Accordion, Accordions } from 'fumadocs-ui/components/accordion'; {/* [IN]: Save to Notion plugin, fumadocs components [OUT]: Web Clipper usage guide and FAQ [POS]: Core feature documentation for information gathering Protocol: Update this file header and the folder's .folder.md when modifying this file */} ## Install Plugin The FLO.W system includes a reading management center that allows you to conveniently manage clipped articles, videos, and posts, or build a systematic reading list. Of course, first you need to install the Save to Notion plugin in your browser. I've prepared a detailed installation tutorial for you. 📖}> Detailed browser plugin installation and configuration tutorial to help you quickly get started with web clipping ## FAQ Please pay attention to this step in the clipping tutorial ![](https://pic.eryinote.com/PicGo/202509121910967.png) Free users can create 4 Forms, which is generally enough. It depends on the website. Some websites set images to not allow syncing. This is not caused by the plugin or Notion. I cannot solve this issue unless the website allows it. You can clip without opening the web version of Notion, as long as your browser and clipping plugin are working properly. The problem occurs when you want to modify the custom Properties of the clip Database, but you find no Properties to select. ![](https://pic.eryinote.com/PicGo/202509121911725.png) The reason is that you haven't associated the correct Database. The Save to Notion plugin should associate with the Database named "FLO.W - Information Harbor DB". Yes. If you need to use your preferred clipping tool on other platforms, just set the clipping destination to "FLO.W - Information Harbor DB". **Question** If I've used other clipping tools before, such as Cubox, Readwise, or Jianyue, and already have an existing clipping Database in Notion, how can I move these clipped articles to the FLO.W system? **Answer** In the FLO.W system, all clipped articles are stored in the "**FLO.W Information Harbor DB**" Database, so you can batch move articles from your old clipping Database to the "**FLO.W Information Harbor DB**" Database. However, before moving, please make sure to read this [important notice](/docs/template-import-guide#migrate-old-notes). First, Save to Notion is not an official Notion plugin, so the Save to Notion account is unrelated to your Notion account. Second, it supports Google email direct login, or you can fill in any of your own email addresses, but both methods require you to ensure you can log in to these email accounts. If none of the above methods work, you need to contact Save to Notion plugin's official email: [hello@savetonotion.so](mailto:hello@savetonotion.so) When searching for the Database name while clipping, it shows "No databases or pages found". You can try the following methods: 1. **Shorten search keywords**: Don't search the full name, search for "Information Harbor" instead of "FLO.W - Information Harbor DB" 2. **Re-login plugin account**: Log out of Save to Notion plugin, completely close and restart your browser, then log in again and try searching 3. **Refresh Notion Database index**: First manually create a few pages in the target Database, press `Ctrl+R` (Mac press `Cmd+R`) in Notion to refresh, then go back to the plugin to search Currently, direct conversion is not supported. **Reason:** If something truly has value to become a [Note](/docs/basic-feature/note-taking), it's better to have an extra manual organization step. Otherwise, there's no difference between [Clipping](#) and [Notes](/docs/basic-feature/note-taking), and eventually your [Note Database](/docs/basic-feature/note-taking) will be filled up. **Recommended approach:** 1. **Relate Note**: You can quickly create a [Note](/docs/basic-feature/note-taking) that is related to the current clipped article through the "Relate Note" Property in [Clipping](#). 2. **Relate Project/Area**: If your purpose for converting [Clipping](#) to [Note](/docs/basic-feature/note-taking) is to relate to a [Project](/docs/basic-feature/project-management), there's actually no need to do so, because [Clipping](#) can directly relate to [Project](/docs/basic-feature/project-management) or [Area](/docs/basic-feature/area). ![](https://pic.eryinote.com/PicGo/202601111655605.png) --- # Before You Buy (https://21notion.com/en/docs/faq/before-purchase) import { Accordion, Accordions } from 'fumadocs-ui/components/accordion'; import { Card, Cards } from 'fumadocs-ui/components/card'; This page compiles the most common questions before purchasing the FLO.W template to help you make an informed decision. Trusted by **1,400+ users** with a **99% positive rating** on Bilibili and **4.7/5** on Xiaohongshu. ## Course vs Template "**Notion All in One**" is my comprehensive Notion tutorial, containing 45 articles, 200+ hands-on examples, and 200,000+ words of content that thoroughly explains all Notion features and usage. The course was updated from June 2023 to December 2024. It's the leading Notion tutorial in mainland China with over 1.2 million CNY in sales, having helped 7,000+ students master Notion from scratch. The course uses English Notion interface screenshots. **Note:** The course is available in Chinese only, through Xiaobot and SSPAI. Think of it this way: the course teaches you the architectural principles of building a Notion system from scratch, while the template is a fully furnished apartment ready for you to move in. So if you have strong self-learning abilities and have the time and patience, you can purchase the course and build your own Notion system. If you prefer to get started quickly without spending time on research and learning, the template is for you. They are independent products, but course knowledge can help you better understand the template's features and usage. ## Choosing Your Version * **Basic Edition (¥199)**: Complete template + tutorials, ready to use, ideal for users who want to get started quickly * **Professional Edition (¥299)**: Basic Edition benefits + Q\&A community + occasional case studies + shortcuts, ideal for users who want guidance to avoid common pitfalls * **Advanced Edition (¥349)**: Professional Edition benefits + free major version upgrades + core user community, currently the best-selling version **Recommendation**: If you use Notion long-term and want continuous feature updates, the Advanced Edition is the most hassle-free choice. You'll get all important upgrades for free without worrying about additional costs. See the [pricing page](/pricing) for a detailed feature comparison. FLO.W covers **15 functional modules** spanning both work and life: Note system, task management, project operations, life domains, web clipper, habit tracking, media logging, asset inventory, game records, subscription management, automation, formulas, iOS shortcuts, Notion AI, and quick buttons. Visit the [feature overview](/docs/get-started) page for detailed descriptions of each module. **Absolutely.** The FLO.W template is specifically designed with a progressive onboarding path for Notion beginners: * **Ready to use**: No Notion technical knowledge required. All database relations and views are pre-configured — just copy and start using * **Complete tutorials**: Every module includes detailed written or video tutorials. 80% of template purchasers are Notion beginners, and most get their personal workflow set up within 3-7 days * **Avoid common mistakes**: The author ["Eryi's Notes"](/about) is a **Notion Certified Expert** with 4 years of Notion teaching experience. The course has helped 7,000+ students master Notion from scratch, making it the leading Notion course in China. The template is built based on common user needs and refined based on user feedback — the most common beginner pitfalls have already been addressed Yes! Since most users don't have a paid Notion subscription, 99% of the template features don't require paid features. Only a very small number of pages (such as database charts) require Notion's paid features, but these don't affect the core workflow. I've also provided free Notion formula alternatives for these visualizations. Even as a free plan user, you can fully experience the core value of the FLO.W template. If you want to learn more about the template's features and usage, you can watch this detailed introduction video (in Chinese). ## Purchase & Refund You're buying time and certainty. Building from scratch is like constructing a house in the dark with your bare hands — slow, exhausting, and prone to constant rework. FLO.W saves you hundreds of hours and puts you on the right track from day one. After purchase you will receive a template link. Open it in your browser and click "Duplicate" to copy the full workspace into your Notion. The entire process takes less than a minute. See the [template import guide](/docs/get-started/import) for detailed steps. We accept **Alipay, WeChat Pay, Visa, Mastercard, UnionPay, and Apple Pay**. International users can complete payment using any major credit card. Visit the [pricing page](/pricing) for details. We occasionally offer promotional discounts. Check the [pricing page](/pricing) for current offers, or follow us on [X (Twitter)](https://x.com/eryidebiji) for announcements. As a digital product, the template cannot be recalled once delivered, so refunds are not available. However, you can feel confident in your purchase: * **Preview before buying**: Watch the 40-minute detailed introduction video (in Chinese) to fully understand the template's features * **Comprehensive tutorials**: All versions include detailed written tutorials, and 80% of beginners get started within 3-7 days * **Community support**: Professional and Advanced Edition users have access to exclusive Q\&A groups where any usage questions can be answered ## After Purchase Yes! FLO.W is continuously updated to keep up with Notion's new features and optimize existing workflows. **Advanced Edition users** enjoy all future major version updates for free on a long-term basis. I announce updates in the community groups and on social media, with detailed upgrade instructions provided. Multiple support channels are available: * **Professional and Advanced Edition users**: Ask questions directly in the exclusive community group — I personally answer questions * **All users**: Send an email to [eryidebiji@gmail.com](mailto:eryidebiji@gmail.com) * **Self-service**: This documentation site has [detailed tutorials](/docs) and a [troubleshooting guide](/docs/faq/troubleshooting) You can make moderate customizations! Once the template is copied to your Notion, you can adjust it to suit your needs. However, we recommend reading the [customization guide](/docs/faq/customization) first to understand the template's underlying structure and avoid accidentally breaking key database relations or workflow connections. *** **Already purchased the template?** Check out [Getting Started](/docs/faq/getting-started) to begin using it. --- # Customization & Modifications (https://21notion.com/en/docs/faq/customization) import { Accordion, Accordions } from 'fumadocs-ui/components/accordion'; import { Card, Cards } from 'fumadocs-ui/components/card'; The template is your personal space and can be adjusted according to your needs. This page helps you understand what can be freely modified and what requires caution. ## Template Modification Principles **Database Property Modifications** | Safe to Do | Not Recommended | | -------------------------------------------------------------------------- | -------------------------------------------------------------------------------- | | Rename properties (e.g., change "Task Name" to "To-do") | Change property types (will cause all existing data in that property to be lost) | | Add new properties (e.g., add "Estimated Time", "Priority", etc.) | Delete relation properties (will break information flow) | | Reorder properties (put frequently used ones first, hide rarely used ones) | Delete formula properties (will break automatic calculations) | | | Delete date properties (will affect calendar views and time filters) | **Special Note for Advanced Edition Users**: * If you're an Advanced Edition user with upgrade benefits, we strongly recommend NOT renaming properties * During upgrades, the new version identifies and updates based on property names. Renamed properties may cause upgrade failures * If you must make changes, add new properties instead of renaming existing ones *** **View and Filter Modifications** You can freely modify these without affecting template functionality: * Adjust filter conditions (e.g., show only your tasks, incomplete tasks) * Change sorting methods (e.g., sort by due date, priority) * Add or delete views (e.g., remove unnecessary report views) * Adjust grouping methods (e.g., group by project, by status) * Rename views *** **Page Content Modifications** You can freely modify these - this is your personal space: * Clear or edit demo data and sample text * Delete tutorial pages * Change page icons and covers * Adjust page navigation structure * Add your own notes and explanations **Note**: * Before deleting pages, confirm they aren't linked or referenced elsewhere * If you delete important demo pages, you can re-copy the template to recover them *** **Data Record Modifications** You can freely modify these - this is your data: * Batch delete demo tasks, projects, notes * Edit existing records * Add your own tasks, projects, notes *** **When is the Right Time to Modify** * After using the template for 2-4 weeks and clearly knowing which parts don't work for you * Not recommended to make extensive modifications right after starting * Suggested to use as-is for a while first, understand what each part does *** **How to Modify Safely** * Make a backup copy of the template before making changes * Test on a test page first, confirm everything works before making full changes * Take screenshots of original settings before modifying, for easy recovery if needed ## Database Templates **What are Default Templates** In the FLO.W system, database templates are the "core mechanism" that ensures features work properly. All database pages automatically apply these templates when created. For example, when creating a Task, the Task Title is automatically named "New Task", and the page icon is set to the default blue circle: ![](https://pic.eryinote.com/PicGo/202511111922118.png) Or, some database pages may include default page content when created. For example, when you create a [Diary](/docs/basic-feature/note-taking#create-diary), the diary page will show content like this: ![](https://pic.eryinote.com/PicGo/202511111924543.png) **How to Modify Default Templates** 1. Find the template location for the database you want to modify ![Template location](https://pic.eryinote.com/PicGo/202509122355153.png) 2. Click step 2 in the image above to enter the template editing interface 3. Modify the default icon or default page content in the template 4. When finished, click on blank space to close the template editing window This way, the next time you activate the template, the new template content will be applied. **Tip**: Since templates contain many relational logic elements, unless necessary, we don't recommend making changes casually. It's best to confirm in the community group before modifying. ## Properties & Views In the various databases of the FLO.W system, there are many properties. You may not need certain properties temporarily, or some important properties might be hidden. **Method 1: Click the property header** ![Property header operation](https://pic.eryinote.com/PicGo/202509122356924.png) * Click directly on the property header to quickly toggle show/hide status **Method 2: Customize layout** ![Customize layout](https://pic.eryinote.com/PicGo/202509122356973.png) * Click "Customize layout" above the page title * Make detailed adjustments to properties in the "Layout" options * Batch manage visibility of multiple properties **Usage Tips** * Show relevant properties based on work needs * On mobile, hide infrequently used properties to optimize display * Create different views for different use cases The homepage layout can be fully customized to your preferences. For detailed customization methods, see [Homepage Layout](/docs/basic-feature/homepage#homepage-layout). For navigation bar adjustment methods, see [Top Navigation Bar](/docs/basic-feature/homepage#top-navigation), including: * Navigation bar principles * How to adjust module positions * How to add/remove navigation items *** **Want to understand the design philosophy?** Check out [System Design Philosophy](/docs/faq/system-design) to learn why things are designed this way. --- # Getting Started (https://21notion.com/en/docs/faq/getting-started) import { Accordion, Accordions } from 'fumadocs-ui/components/accordion'; import { Steps, Step } from 'fumadocs-ui/components/steps'; import { Card, Cards } from 'fumadocs-ui/components/card'; After purchasing the template, start your FLO.W journey here. ## Getting Started Based on your Notion experience level, we recommend different learning strategies: **Notion Beginners** * We suggest at least skimming through chapters 1 and 2 of the course to understand the most basic Notion operations before using the template * This helps avoid basic operation issues when using the template **Users with Some Experience** * You can start using the template directly and refer to the course content when you encounter questions * When asking questions in the Lark group, mention that you're a course student, and I'll provide the relevant course chapter for better understanding **Experienced Users** * With sufficient hands-on experience and research ability, you can use the template directly * When encountering issues, you can explore independently or refer to relevant documentation **Best Practice**: Learning with the course is most effective, but you can also start with simple note-taking to avoid learning without practicing, maintaining a sense of accomplishment. We've prepared a complete onboarding path for beginners: 1. **Read the Quick Start Guide** - Check out [Quick Start](/docs/quick-start) for three basic recommendations 2. **Download and Install Notion** - If you haven't installed it yet, refer to [Notion Download & Install](/docs/notion-download) 3. **Import the Template** - Follow the [Template Import Tutorial](/docs/template-import-guide) to complete the template copy 4. **Watch the Tutorial Videos** - The template includes detailed video tutorials - just follow along **Important**: We don't recommend making extensive modifications to the template at the beginning. Use it as-is for 2-4 weeks, understand what each part does, then make adjustments. ## Template Import Template import failures usually fall into these categories: 1. **Network Issues** - Notion servers are overseas. Use a stable network connection 2. **Browser Compatibility** - We recommend using Chrome or Edge browsers 3. **Account Issues** - Make sure you're logged into your Notion account For detailed solutions, check [Template Import Tutorial - Copy Failed](/docs/template-import-guide#copy-failed). We provide a complete Notion installation guide, including: * Windows / Mac desktop client download * iPhone / iPad / Android app download * Account registration process * Chinese localization settings * Access acceleration tools For details, see [Notion Download & Install](/docs/notion-download). ## Version Migration First, you need to understand that in the FLO.W system, all data is stored in specific databases. Note pages are stored in the Note database, and Project pages are stored in the Project database. Using Notes as an example, the basic principle of migration is to batch migrate all pages from the Basic Edition Note database to the Advanced Edition Note database. So you need to know: * Where is the database? * How to batch migrate? Let's use migrating Notes as an example.

Find the Note Database

Click on the Note database tab, then click "Open source database", and note the title of this source database

Open source database

Select All Note Pages

Select all Note pages

Select all note pages

Batch Move to Advanced Edition Database

After selecting all, follow the method shown below to batch move these note pages to the Advanced Edition Note database

Batch move pages
**Important Tips** 1. Before batch moving, always migrate one or two pages first to test the process and avoid errors. 2. After migrating Notes, you can proceed to migrate Projects, Areas, and other database content
*** **Having issues?** Check [Troubleshooting](/docs/faq/troubleshooting) or [Technical Support](/docs/faq/support) for help. --- # Technical Support (https://21notion.com/en/docs/faq/support) ## Upgrade Benefits Thank you for choosing the FLO.W Notion template. As a **Max Edition** user, you enjoy the special benefit of **free major version upgrades**. In short, as Notion's features evolve and based on community feedback, I will continuously update and optimize the template's functional modules, add new modules, formulas, and workflow designs. **Upgrade Scope Definition** **1. Deep optimization of existing workflows, not unlimited feature additions** The focus is on helping you complete tasks smoothly and efficiently, not on isolated feature points. * **Included ✅:** Continuous review and restructuring of your existing core workflows. For example, completely redesigning the "Task Management" pipeline from collection, planning, execution to review, making it smarter and more automated. Or optimizing the "Content Creation" flow from inspiration capture, research, drafting to final publishing. These are all part of the free "major version updates". * **Not Included ❌:** Developing entirely new domain templates unrelated to existing core workflows, such as a standalone "Pet Health Management" or "Home Renovation Project" template. **2. Experience enhancement of existing modules, not unlimited product line expansion** The commitment is to make your existing tools sharper and better. * **Included ✅:** Continuously upgrading your existing core modules. For example, evolving the "Notes" module from a simple information collector to a powerful knowledge base with advanced tagging, bi-directional linking, and even knowledge graph visualization. Or adding richer views (Gantt charts, Kanban boards) and collaboration features to "Project Management". These are all part of the free "major version updates". * **Not Included ❌:** Adding a completely independent new "Professional Extension Pack" requiring extensive domain expertise, such as a "Household Asset & Liability Management Module" with complex formulas and report analysis, or a "Personal Health & Fitness Management Module". These would be released as separate paid products. **3. Adherence to the FLO.W product philosophy** FLO.W's mission is to build a one-stop personal productivity system around four core scenarios: **"Effective Recording, Efficient Creation, Organized Management, Deep Review"**. * **Included ✅:** Updates that deepen the experience across these four scenarios are within the scope of free "major version updates". Whether it's integrating new methodologies (such as PARA or Zettelkasten), or adding auxiliary features to close the loop (such as more powerful data dashboards, automated weekly/monthly report generators) — as long as it serves this core philosophy, you'll receive it for free. * **Not Included ❌:** Any services or derivatives beyond the "product" itself, such as 1-on-1 Notion consulting, paid productivity courses, standalone software apps, or browser extensions. **Upgrade Examples** To give you a clearer picture, here are some specific examples: | **Category** | **✅ Included in "Free Upgrade"** | **❌ Not Included in "Free Upgrade"** | | ------------------------- | ------------------------------------------------------------------------------------------------ | -------------------------------------------------------------------------------------------------------- | | **Workflow Optimization** | Completely restructure the "GTD Task Management" flow for a more automated pipeline. | Release a brand-new standalone student classroom note template. | | | Optimize the "Content Creation" flow, adding pipeline management from inspiration to publishing. | Release a standalone enterprise CRM system. | | **Module Enhancement** | Add team collaboration views and permission management to the "Project Database". | Develop a separately paid "Advanced Charts & Data Visualization" plugin. | | | Add AI auto-tagging and classification to "Quick Notes". | Release a "Personal Finance" premium template with complex accounting standards. | | | Deeply integrate the "Reading Module" with the "Notes Module" for automatic citation linking. | Develop a paid automation script for syncing template content to other apps. | | **Experience Innovation** | Launch a new UI design with custom covers and icons for the FLO.W template. | Host a paid offline "Notion Productivity" training camp. | | | Introduce PARA or Zettelkasten methodologies with corresponding database structure adjustments. | Provide 1-on-1 paid consulting for personal Notion system setup. | | | Add a global "Data Dashboard" for aggregating key metrics. | Write and publish a paid e-book "Mastering FLO.W: The Art of Digital Life Management". | | | | If FLO.W adapts to non-Notion platforms (e.g., Feishu, Flowus) in the future, the new platform versions. | **Additional Statement:** The world of digital tools and methodologies is constantly evolving, and Notion's own features continue to iterate. Therefore, we cannot foresee and exhaustively list all future possibilities. Based on this, I reserve the right to make final interpretations and decisions regarding the scope of "major version updates" based on product development, technological changes, and market conditions. Any future decisions will be made on the premise of not harming the core interests of template users and following the core product philosophy described in this document. Thank you for your understanding and support. Due to Notion's technical limitations, the template does not support automatic "hot updates". Based on this, FLO.W adopts a modular **manual update mechanism** to ensure user data safety and system flexibility. **Update Process** 1. Modular Release: When there are feature updates or new modules, I will release an independent **"Feature Component Template"**. This component contains all new features and related databases, and this update method preserves your existing notes library without starting over. 2. Configuration Guide: Along with each new component, a detailed **"Configuration Guide"** (usually in video or illustrated format) will be provided. The guide will explain all the steps needed to integrate the new component into your existing FLO.W system, such as page copying, database linking, etc. **Modular Update Features** * Data Preservation: The update process will not touch or overwrite any of your existing personal data and personalized settings, ensuring the integrity and safety of your current workspace content. * Selective Integration: Users can **choose whether to integrate each released module** based on their own needs. This allows the system to stay lean and avoid bloating from unnecessary features. * Educational Value: The configuration guides explain the Notion logic behind each feature. Following the manual configuration process objectively helps **users learn Notion's functionality and advanced application methods simultaneously**. * User Autonomy: The manual configuration process allows users to clearly understand every change to the system structure, thereby enhancing their understanding and control of the entire system. ## Template Upgrade by Price Difference Strategy Currently, the FLO.W template provides community Q\&A services for Professional Edition and Advanced Edition users. If you purchased the Basic Edition, you can contact customer service on the platform where you bought the template to upgrade by paying the price difference. **Scan QR Code in Bilibili App** **Scan QR Code in Xiaohongshu App** **Scan WeChat QR Code** Please email [eryidebiji@gmail.com](mailto:eryidebiji@gmail.com) and send your purchase record Price difference upgrades cannot be combined with other offers. The difference is calculated based on original prices. 1. Basic Edition → Professional Edition: Pay difference of 100 yuan `299-199` 2. Basic Edition → Advanced Edition: Pay difference of 150 yuan `349-199` 3. Professional Edition → Advanced Edition: Pay difference of 50 yuan `349-299` ## Apply to Join Lark Community Currently, the FLO.W template provides community Q\&A services for Professional Edition and Advanced Edition users. If you purchased the Basic Edition, you can contact customer service on the platform where you bought the template to upgrade by paying the price difference.
ℹ️ For group verification, please send \[Purchase Platform + Order Number]
**Scan QR Code in Lark App** * Scan QR code in Lark App and enter verification answer * Verification answer 👉 \[Purchase Platform + Order Number] FLOW Professional Edition Community QR Code **Click Link in Client** * Group link 👉 [Click Me](https://applink.feishu.cn/client/chat/chatter/add_by_link?link_token=249m84a0-e299-45d4-ad5a-4c78c402d5a8), enter verification answer * Verification answer 👉 \[Purchase Platform + Order Number] **Scan QR Code in Lark App** * Scan QR code in Lark App and enter verification answer * Verification answer 👉 \[Purchase Platform + Order Number] FLOW Advanced Edition Community QR Code **Click Link in Client** * Group link 👉 [Click Me](https://applink.feishu.cn/client/chat/chatter/add_by_link?link_token=11fka34d-2b35-4d5e-812f-f03b715323cd), enter verification answer * Verification answer 👉 \[Purchase Platform + Order Number] ## Question Guidelines To resolve your issue faster, please provide the following information when posting in the community: * 🔍 **Issue Description**: Describe the issue in detail * 📸 **Screenshots/Recordings**: Specific manifestation of the issue * 🔄 **Steps to Reproduce**: How to reproduce this issue ## Official Notion Updates The FLO.W template evolves alongside Notion's official feature updates. Visit the [Notion Updates Timeline](/notion-updates) to stay up to date with every noteworthy new feature and improvement. --- # System Design Philosophy (https://21notion.com/en/docs/faq/system-design) import { Accordion, Accordions } from 'fumadocs-ui/components/accordion'; import { Steps, Step } from 'fumadocs-ui/components/steps'; import { Card, Cards } from 'fumadocs-ui/components/card'; import { BlogCTA } from '@/components/blog/blog-cta'; This page explains the core design philosophy of the FLO.W template, helping you understand "why things are designed this way" for better template usage. ## Meta Information Architecture **Reader's Question:** Why not merge the Project database with the Task database? Databases already have sub-task functionality, allowing nesting within the same database - theoretically no need for a second database. Is it because the Task database would become too complex? Or are there formula or property conflicts? **My Answer:** This question can also be asked as: why aren't the Area and sub-Area databases merged? Or whenever you wonder "why aren't A and B databases combined?", you can refer to the answer below. You'll also learn some of my thinking behind designing this template.

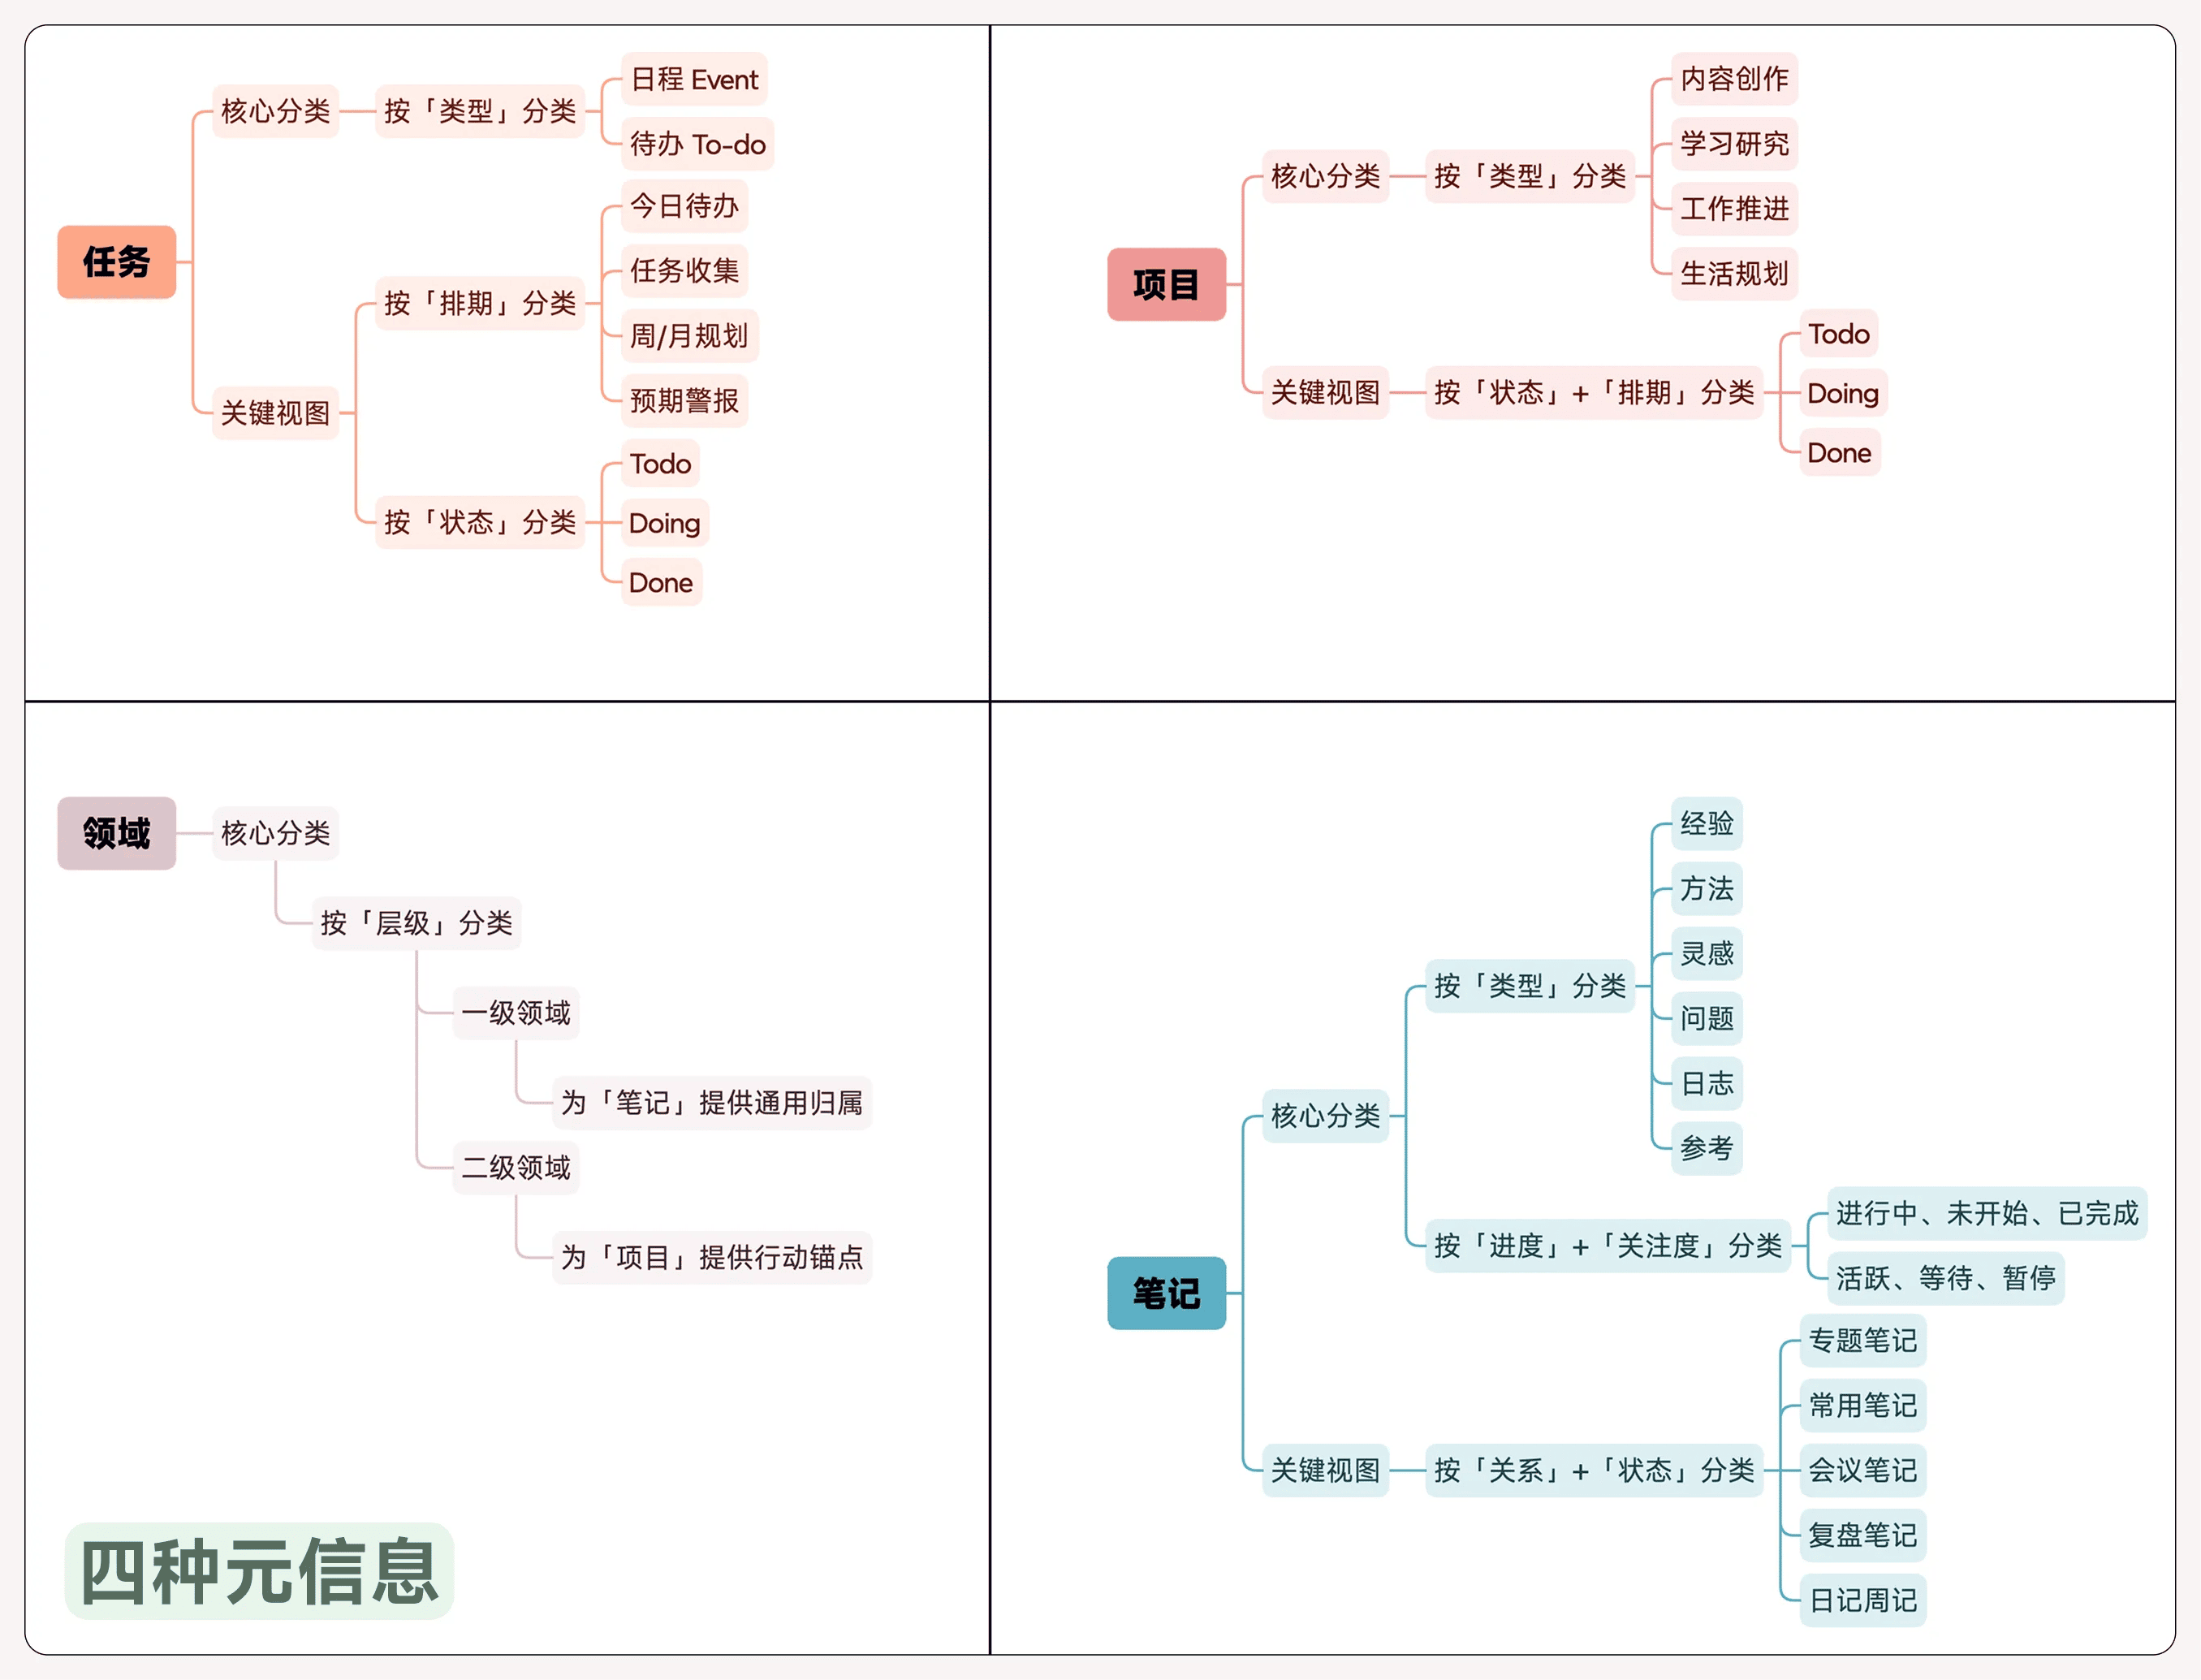
Reason 1: Meta Information

First, the FLO.W system is built on 4 types of meta information. Understanding "meta information" is key to answering this question. I highly recommend reading the article below and searching for the keyword "limited types of meta information".

Article link: Reconsidering Notion: My 7-Year Reflection

Meta information diagram

Project:

  • Is a goal container, representing an outcome that requires multiple steps to achieve, with a clear beginning and end
  • Its purpose is "defining direction" and "measuring progress", so its core properties are strategic ones like "Progress Bar", "Project Duration", "Associated Area"
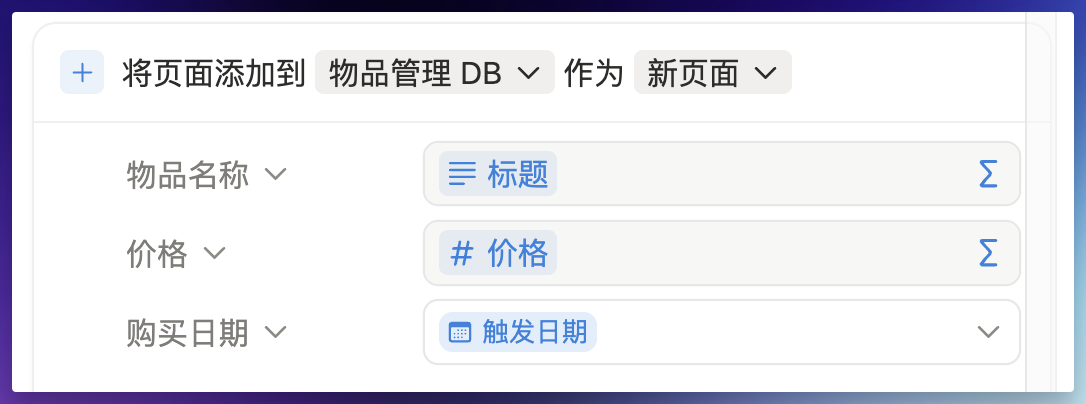
Task:

  • Is an action unit, representing a specific action that can be started immediately
  • Its purpose is "driving execution". So its core properties are execution-oriented ones like "Next Action", "Schedule Date", "Status"

Different databases serve as different information containers, defining information types and flow directions through mutual relations. This is detailed in the article above - if you have time, I recommend reading it to systematically understand the template's construction logic.

Reason 2: Property Confusion

Based on the meta information definition, Task and Project databases must be independent, otherwise properties would mix together, requiring each property to carry two sets of usage logic. A specific "task" entry would show invalid properties like "Project Progress Bar"; a "project" entry would show execution properties like "Next Action".

This would make the database bloated and chaotic, and increase workload when recording, requiring repeated scrolling to find the appropriate property.

Reason 3: Sub-task Views Aren't Flexible

If Tasks were placed as sub-items under Projects, based on my long-term practical experience, you'd inevitably encounter many "view filtering" problems in the future.

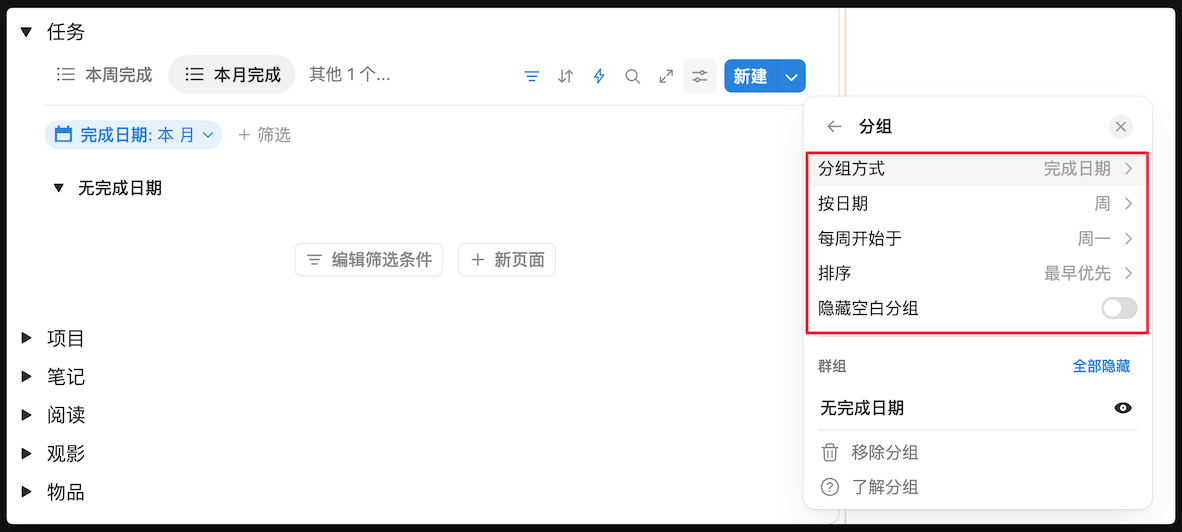
Reason 4: Formula Statistics

Currently both Tasks and Projects have their own formula statistical reports. They must be stored in separate databases for formula statistics to work properly, reducing complexity and performance overhead during calculations.

Formula statistics reference: Click here

**Question**: My daily work is quite fragmented and doesn't fit into any specific project, but it belongs to a specific work area. How can I better manage these tasks? **Recommended Method**: 1. Create a project called "June Work Summary" 2. Link all fragmented tasks this month to this project 3. Link this project to a specific sub-Area 4. Achieve the following hierarchy: * sub-Area XXX * 202506 - Work Summary * Fragmented Task 1 * Fragmented Task 2
## Area Design **Question** I often encounter notes that don't belong to any currently established area, but are worth keeping. Creating a separate area for them isn't worthwhile, but without an area I lose a dimension of classification. What should I do? **Answer** In the FLO.W system's Area module, I've kept an "Unassigned Notes" view that filters all notes without an Area or sub-Area set. This way you can collectively review notes without areas set and see if they share any commonalities. If so, perhaps you can create an Area or sub-Area for these notes. ![](https://pic.eryinote.com/PicGo/202509130216987.png) So if you think this module should be visible, you can directly @ this page in the navigation bar. (Method reference @navigation bar video complete guide) **Question** The template has Areas and sub-Areas. How do I create third and fourth level areas? **Answer** The template adopts a two-tier structure of "Area" and "sub-Area" in the Area module through careful design. The purpose is to establish the clearest, most efficient connection between "macro strategy" and "specific action". Before considering adding more levels, understanding the design intent is crucial. First you need to read [Understanding Areas](/docs/basic-feature/area), then continue reading below. Adding unlimited third and fourth level areas easily leads to bloated management structures, increased decision burden, and may cause information to become fixed in corners, violating the core concept of information flow. When classification finer than sub-Area is needed, we don't recommend directly creating new database levels. Instead, choose one of these two paths that better fit system logic based on the nature of what you're organizing. When the essence of an idea is "to complete something specific", it's better suited as a project. * **Example Scenario**: Under Area "Career Development" and sub-Area "Data Analysis Skills", you want to start learning Python. Don't create a third-level area "Python Learning". * **Recommended Action**: In the `Project Management` database, create a new project called "Learning - Python Basics" and link it to sub-Area "Data Analysis Skills". * **Core Advantage**: Projects naturally have goals and timelines, driving task breakdown and execution, forming action loops. After project completion and archiving, the area structure stays clean and strategic long-term. When the essence of an idea is "a long-term continuous direction", it's better suited as a project. When the essence of an idea is "requiring deep organization of a specific knowledge domain", it's better suited as a core node in a knowledge network. * **Example Scenario**: Under Area "Personal Mental Growth", you've developed deep interest in "Stoic Philosophy" and want to systematically organize it. * **Recommended Action**: 1. In the `Note Management` database, create a note called "Topic: Stoic Philosophy Research". 2. Link this note to Area "Personal Mental Growth". 3. All more specific notes on this topic (like reading notes, personal reflections) are linked to this "Topic Note" through "Parent/Child" relationships. * **Core Advantage**: Building knowledge networks with notes as core is more flexible and lightweight than creating rigid hierarchies. The topic note page itself becomes the thinking center and index directory for that subject. \| --- | --- | --- | \| Something with **clear goals that can be completed in a period of time** | Define it as a **`Project`** | Define goals with **action** | \| A knowledge topic **requiring long-term learning and accumulation** | Create it as a **`Topic Note`** | Organize knowledge with **knowledge** | **Community Reader's Question** > I have some personal principles I want to practice long-term, and I want to create a project to continuously improve them. I feel they should belong under the Area "Personal Growth", but it also feels like a sub-Area. How should I organize it to build the hierarchy of `Personal Growth -> Practicing Principles -> Principle Improvement Project -> Specific Tasks`? **My Answer** **I. Areas are rooms, Notes are books** Before starting operations, we need to establish a concept: * **Area is a "room"**: It represents a long-term responsibility area of your life, a space you need to continuously maintain and invest in, like a study (personal growth), kitchen (health management). It's structure, it's a container. * **Note is a "book" or "tool"**: It represents specific knowledge, information, methodologies, reference materials. Your "personal principles" are a "life guidebook" that needs to be repeatedly read and revised. It's content, it's substance. The core confusion in the reader's question is **trying to treat a "book" as a "room"**. **II. The Wrong Approach: Forcing Hierarchy** If we follow traditional folder hierarchy thinking, we'd try to build a seemingly reasonable hierarchy chain like the questioner: * Area: Personal Growth (room) * sub-Area: Practicing Principles (trying to make a book into a small room) * Project: Improve Personal Principles * Tasks... The problem with this structure is that "Practicing Principles" itself doesn't have Area characteristics - it doesn't have independent, long-term investment goals. It itself is "content" that needs to be referenced. Forcing it as a sub-Area makes your area structure contain both rooms and books, creating confusion. **III. FLO.W's Solution** "Practicing Principles" is highly condensed wisdom, SOPs that guide your actions - this is exactly what the Notes database exists for. 1. Enter the `Note Management` database 2. Create a new note titled "My Personal Practicing Principles" 3. Inside this note page, write down each of your principles in detail 4. Link this note to the Area "Personal Growth" Now, your "book" is in the correct "room". Now you can create a project for the goal "Improve Principles" and create linkage with the principles note you just created. 1. Enter the `Project Management` database 2. Create a new project, for example: "Q4 Personal Principles Review and Iteration" 3. Link this project to sub-Area "Personal Mental Model Building" (or another sub-area you've defined) 4. **The key step**: In this project's "Related Notes" property, find and link your note "My Personal Practicing Principles" This way, we've built a new, more powerful structure: * **Area:** Personal Growth * **sub-Area:** Personal Mental Model Building * **Project:** Q4 Personal Principles Review and Iteration * **Related Note** **\[My Personal Practicing Principles]** * **Task:** 1. Review last quarter's principle execution... The Principles note is no longer a rigid link in a hierarchy chain, but like an external knowledge USB drive, flexibly plugged into projects that need it. **Benefits of this approach:** * **Clear structure**: Your Area structure always only stores responsibility areas, maintaining strategic purity * **Highly flexible**: The same "principles" note can be linked and reused by multiple different projects in the future - "Annual Planning Project", "Relationship Review Project" - truly achieving knowledge flow When you encounter a new concept and are unsure how to organize it, ask yourself: Is it a "place" I need to be responsible for long-term, or a "thing" I need to reference or act on? * If it's a "place", it should be an Area * If it's a "thing", it's likely a Note or a Project *** **Want to learn more?** Read [FLO.W Design Intent](/flow/design-philosophy) or [Reconsidering Notion: My 7-Year Reflection](/blog/notion-7-year-reflection). --- # Troubleshooting (https://21notion.com/en/docs/faq/troubleshooting) import { Accordion, Accordions } from 'fumadocs-ui/components/accordion'; import { Steps, Step } from 'fumadocs-ui/components/steps'; import { Card, Cards } from 'fumadocs-ui/components/card'; Having issues? This page documents common FLO.W template problems and their solutions. ## Recovering Deleted Content Accidentally deleted something? Don't panic — follow these methods to get it back. The simplest fix: immediately press the undo shortcut. * **Windows**: `Ctrl + Z` * **Mac**: `Cmd + Z` You can press it multiple times to step back through recent actions. **Note**: Undo history is cleared after closing or refreshing the page, so this only works right away. If you accidentally deleted a module on a page (like a database view), but the page itself is still there — don't worry. You only removed the "display window"; the database and all its data are still intact. **Method 1: Restore via Page History** 1. Click the `···` menu at the top-right of the page 2. Select **Page History** 3. Find the version from before the deletion in the left timeline 4. Click **Restore** **Method 2: Re-embed from the Database Page** If Page History doesn't work, you can manually add the database back. All original databases in FLO.W are centrally stored in the "Database" page accessible from the top navigation bar — just find it, copy the link, and paste it back: 1. Open the FLO.W top navigation bar and go to the **Database** page 2. Find the database you need (e.g., "Check-in Dynamics") 3. Open it, then press `Ctrl+L` (Mac: `Cmd+L`) to copy the link 4. Go back to the original page, paste the link to create a linked view 5. Adjust database settings as needed (layout, property visibility, etc.) Deleted pages in Notion go to the **Trash** and can be recovered within 30 days: 1. Click **Trash** at the bottom of the left sidebar 2. Search for the deleted page by name 3. Click **Restore** **Note**: Trash content has a retention period — restore it as soon as possible. ## Template Activation Issues If you encounter issues where templates won't activate when creating notes in a database: ![Template activation issue](https://pic.eryinote.com/PicGo/202509122357558.png) **Solution Steps** 1. Click on the database view title 2. Open the Source Database 3. Use `Ctrl+L` (Windows) or `Cmd+L` (Mac) to copy the Source Database link 4. Paste the copied link into the problematic database page 5. Create a new linked view 6. Test if the new linked view's template activates properly **If the Issue Persists** * Start a new topic in the Lark group * Provide specific error screenshots and operation steps * We'll help you resolve the issue quickly **Prevention Tips** * Avoid randomly deleting or moving source databases * Maintain template structure integrity During actual operation, when you create a new page but find it looks different from what I showed in the video, the reason might be that you didn't successfully activate the template. In this case, you can click the template button at the bottom of the page, wait a moment, and the template will be reactivated. ![](https://pic.eryinote.com/PicGo/202509130147697.png) But sometimes you might find there's no template button on the page. This is because the page is no longer a "blank page" - only a "**completely empty blank page**" will show the template button. In this situation, you can click on the page, select all content (including empty paragraphs), then delete them to restore the page to a "blank page", and the template button will appear. ## Known Bug Fixes Due to the massive scale of the FLO.W system, there may be some errors in various corners. This section is dedicated to fixing these errors. > **Applies to**: Users who copied the template before November 3, 2025. Templates copied after this date have this issue fixed. **Issue Description** In clipped articles, clicking the "Complete" button doesn't change the reading status to "Completed" ![](https://pic.eryinote.com/PicGo/202511022055293.png) **Solution** Click the "Complete" property, and the following prompt will appear ![](https://pic.eryinote.com/PicGo/202511022056791.png) Then click "Edit property - Edit automation", then click where the error occurred ![](https://pic.eryinote.com/PicGo/202511022057911.png) Change "Deleted option" to "Completed" ![](https://pic.eryinote.com/PicGo/202511022058713.png) Finally click the save button ![](https://pic.eryinote.com/PicGo/202511022058209.png) > **Applies to**: Users who copied the template before November 3, 2025. Templates copied after this date have this issue fixed. **Issue Description** When the month reaches November or December, the heatmap display won't align correctly, as shown below: ![](https://pic.eryinote.com/PicGo/202511022038686.jpeg) **Solution** Copy the code below and replace the original code ``` /* ========== Check-in Statistics Board (Based on Current Month) - Integrated Habit Categories and Monthly Goals ========== */ lets( /* --- Core Variables --- */ boardReferenceDate, now(), /* Board always based on current date and time */ currentYear, boardReferenceDate.formatDate("YYYY"), /* Current year string */ currentMonth, boardReferenceDate.formatDate("MM"), /* Current month string */ boardYearMonth, currentYear + "/" + currentMonth, /* Current year-month, e.g., "2025/05" */ /* --- Today's Check-in Status --- */ todayDateText, now().formatDate("YYYY/MM/DD"), allRecords, prop("打卡记录"), /* All check-in records */ isCheckedInToday, allRecords.filter(current.prop("日期").formatDate("YYYY/MM/DD") == todayDateText).length() > 0, todayCheckInStatusText, if(isCheckedInToday, "✅ 今天已打卡", "❌ 今天未打卡"), habitCategory, prop("习惯分类"), /* Get habit category */ monthlyLimitTarget, prop("目标/上限"), /* Get monthly limit or target value */ /* Adjust markers and colors based on habit category */ triggerMark, if(habitCategory == "好习惯", "✓", "x"), userDefinedColorForHabit, prop("习惯颜色"), triggerColor, if( habitCategory == "好习惯", "green", empty(userDefinedColorForHabit) ? "red" : userDefinedColorForHabit ), /* --- 1. Calculate Monthly Trigger/Completion Count --- */ /* allRecords already defined above */ monthlyTriggers, allRecords.filter( current.prop("日期").formatDate("YYYY/MM") == boardYearMonth ).length(), /* --- 2. Build First Row Habit Info String (Displayed for Both Good and Bad Habits) --- */ habitInfo, lets( baseText, format("本月 ") + monthlyTriggers + " 次", actualSuffixText, /* Initialize suffix text */ if(empty(monthlyLimitTarget), "", /* If no target/limit set, suffix is empty */ if(habitCategory == "好习惯", lets( neededForTarget, monthlyLimitTarget - monthlyTriggers, if(neededForTarget <= 0, "|已达标", "|还需 " + format(neededForTarget) + " 次" ) ), /* When it's a bad habit */ lets( remainingCount, monthlyLimitTarget - monthlyTriggers, if(remainingCount >= 0, "|剩余 " + format(remainingCount) + " 次", "|已超额 " + format(abs(remainingCount)) + " 次" ) ) ) ), (baseText + actualSuffixText).style("b", "u") /* Combine and apply styles */ ), /* --- 3. Month and Week Headers --- */ monthHeader, lets( monthNum, boardReferenceDate.formatDate("MM").toNumber(), monthText, if(monthNum >= 11, boardReferenceDate.formatDate("MMM"), /* Nov/Dec use abbreviation */ boardReferenceDate.formatDate("MM") + "月" /* 1-10 use numbers */ ), monthText.style( triggerColor + "_background", "c", "b", triggerColor ) ), dayAbbreviations, ["M", "T", "W", "T", "F", "S", "S"], weekHeader, dayAbbreviations.map( lets( dayAbbr, current, dayIndex, index, systemToday, now().day(), isToday, (systemToday == 0 && dayIndex == 6) || (systemToday != 0 && systemToday - 1 == dayIndex), dayAbbr.style( triggerColor + "_background", "c", "b", isToday ? ((triggerColor == "yellow" || triggerColor == "pink" || triggerColor == "green" || triggerColor == "gray") ? "brown" : "white") : triggerColor ) ) ).join(" "), fullHeader, monthHeader + " " + weekHeader, /* --- 4. Weekly Check-in Heatmap --- */ firstDayOfBoardMonth, parseDate(currentYear + "-" + currentMonth), startDayOfWeekForBoardMonth, firstDayOfBoardMonth.day(), week1StartDate, firstDayOfBoardMonth.dateSubtract((startDayOfWeekForBoardMonth + 6) % 7, "days"), weekDaysOffsets, [0, 1, 2, 3, 4, 5, 6], weekOffsetsForMap, [0, 7, 14, 21, 28, 35], allWeekViewsRendered, weekOffsetsForMap.map( lets( daysToAdd, current, currentWeekStartDate, week1StartDate.dateAdd(daysToAdd, "days"), currentWeekIndex, index, isThisWeekPotentiallyRelevant, currentWeekStartDate.formatDate("YYYY/MM") == boardYearMonth || currentWeekStartDate.dateAdd(6, "days").formatDate("YYYY/MM") == boardYearMonth, displayThisWeek, (currentWeekIndex < 5) || (currentWeekIndex == 5 && isThisWeekPotentiallyRelevant), weekViewContent, displayThisWeek ? ( (currentWeekStartDate.formatDate("WW") + "周").style( currentWeekStartDate.formatDate("YYYY/WW") == now().formatDate("YYYY/WW") ? triggerColor + "_background" : "", "c", "b", triggerColor ) + " " + weekDaysOffsets.map( lets( dayOffset, current, currentDayInGrid, currentWeekStartDate.dateAdd(dayOffset, "days"), isCurrentDisplayMonth, currentDayInGrid.formatDate("YYYY/MM") == boardYearMonth, dailyTriggersCount, isCurrentDisplayMonth ? allRecords.filter( current.prop("日期").formatDate("YYYY/MM/DD") == currentDayInGrid.formatDate("YYYY/MM/DD") ).length() : 0, isActualToday, currentDayInGrid.formatDate("YYYY/MM/DD") == todayDateText, /* Use todayDateText for comparison */ (dailyTriggersCount > 0 ? triggerMark : (isCurrentDisplayMonth ? "·" : " ")).style( dailyTriggersCount > 0 ? triggerColor + "_background" : (isActualToday && isCurrentDisplayMonth ? "blue_background" : ""), "c", "b", dailyTriggersCount > 0 ? triggerColor : (isCurrentDisplayMonth ? (isActualToday ? "white" : "gray") : "") ) ) ).join(" ") ) : "", weekViewContent ) ).filter(current != "").join("\n"), /* --- Build Monthly Target/Limit Text Line (for summary) --- */ monthlyTargetDisplayLine, if(empty(monthlyLimitTarget), "", /* If target/limit is empty, this line is empty */ if(habitCategory == "好习惯", format("本月目标 ") + format(monthlyLimitTarget) + " 次", format("本月上限 ") + format(monthlyLimitTarget) + " 次" ) ), /* --- Calculate Last Month and Year Statistics (for summary) --- */ dateForLastMonth, boardReferenceDate.dateSubtract(1, "months"), lastMonthYearMonth, dateForLastMonth.formatDate("YYYY/MM"), lastMonthTriggers, allRecords.filter( current.prop("日期").formatDate("YYYY/MM") == lastMonthYearMonth ).length(), percentageChangeText, /* Adjust wording for "increase from 0" */ if(lastMonthTriggers == 0, /* When last month was 0 times */ if(monthlyTriggers > 0, "本月增加 " + format(monthlyTriggers) + " 次", /* Fixed: removed duplicate "last month 0" */ "无变化" /* If this month is also 0, no change */ ), /* When last month wasn't 0, calculate percentage */ lets( diff, monthlyTriggers - lastMonthTriggers, percentage, round(diff / lastMonthTriggers * 100), if(percentage == 0, "无变化", if(percentage > 0, "增加 " + format(percentage) + "%", "下降 " + format(abs(percentage)) + "%" ) ) ) ), lastMonthSummary, "上个月 " + format(lastMonthTriggers) + " 次|" + percentageChangeText, thisYearTriggers, allRecords.filter( current.prop("日期").formatDate("YYYY") == currentYear ).length(), thisYearSummary, "今年总计 " + format(thisYearTriggers) + " 次", /* --- 5. Final Assembly of All Parts --- */ finalOutput, todayCheckInStatusText + "\n" + habitInfo + "\n" + fullHeader + "\n" + allWeekViewsRendered + "\n\n" + if(empty(monthlyTargetDisplayLine), "", monthlyTargetDisplayLine + "\n") + lastMonthSummary + "\n" + thisYearSummary + "\n", finalOutput ) ``` > **Applies to**: Users who copied the template before November 2, 2025. Templates copied after this date have this issue fixed. **Issue Description** Open an article in the Web Clipper module, find the "Relation Property Last Edited Time" property, and clicking it shows an error like below: ![](https://pic.eryinote.com/PicGo/202511021714058.png) **Solution** Copy the following code and completely replace the original ``` lets( project,prop("关联项目").map(current.prop("上次编辑时间")), task,prop("关联任务").map(current.prop("上次编辑时间")), extract,prop("关联摘录").map(current.prop("Last Edited Time")), author,prop("出自").map(current.prop("Last Edited Time")), category,prop("书单分类").map(current.prop("Last Edited Time")), subArea,prop("次级领域").map(current.prop("Last Edited Time")), note,prop("关联笔记").map(current.prop("上次编辑时间")), Area,prop("一级领域").map(current.prop("Last Edited Time")), content,prop("Last Edited Time"), [Area,note,subArea,category,author,author,extract,task,project,content].flat().unique().sort().reverse().first() ) ``` This change doesn't affect any functionality, it just removes unused code. > **Applies to**: Users who copied the template before September 14, 2025. Templates copied after this date have this issue fixed. **Issue Description** In some cases, if you open a database and click the "Homepage" button at the top Homepage button 
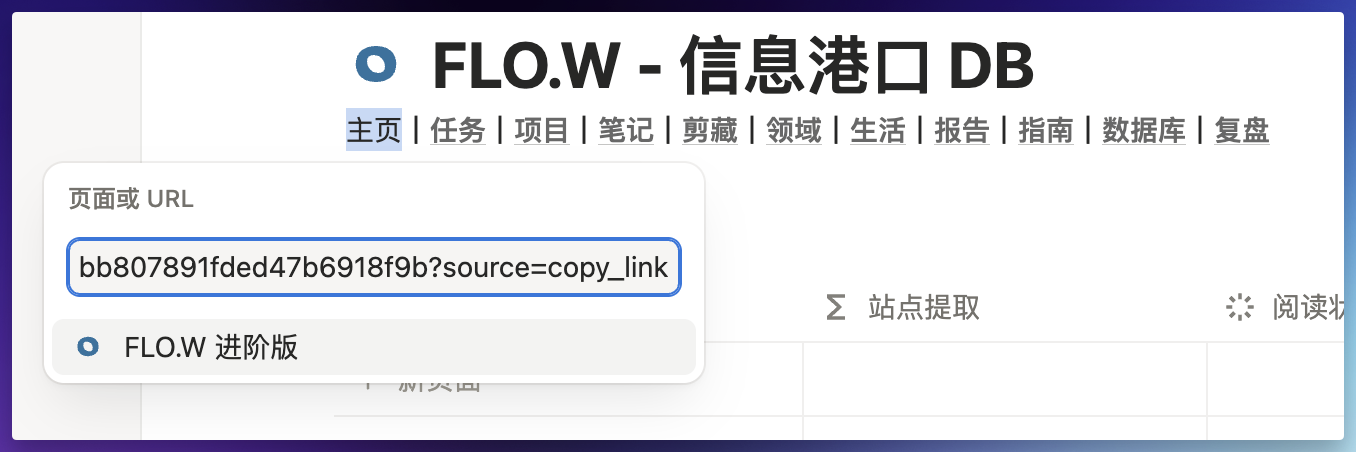
But it redirects to some webpage location Redirect error **Solution** **Method 1: Fix the Link** Go to your template homepage, then use shortcut Ctrl+L (Mac users use Cmd+L) to copy the homepage link Copy homepage link Return to the database page with the issue, then edit the "Homepage" button hyperlink 1. Hover over the word "Homepage" 2. Click the "Edit" button, a popup will appear Edit homepage button In the "Page or URL" input field, paste the link from step 1, press Enter after pasting, then click the "Homepage" button and it will navigate to the correct homepage. Paste link **Method 2: Delete Navigation** Since this navigation location is used infrequently, you can also directly delete the entire navigation string - it generally won't affect usage. > **Applies to**: Users who copied the template before September 14, 2025. Templates copied after this date have this issue fixed. **Issue Description** In the "Life - Wishlist" module, there's an "Add to Purchased" button Add to purchased button 
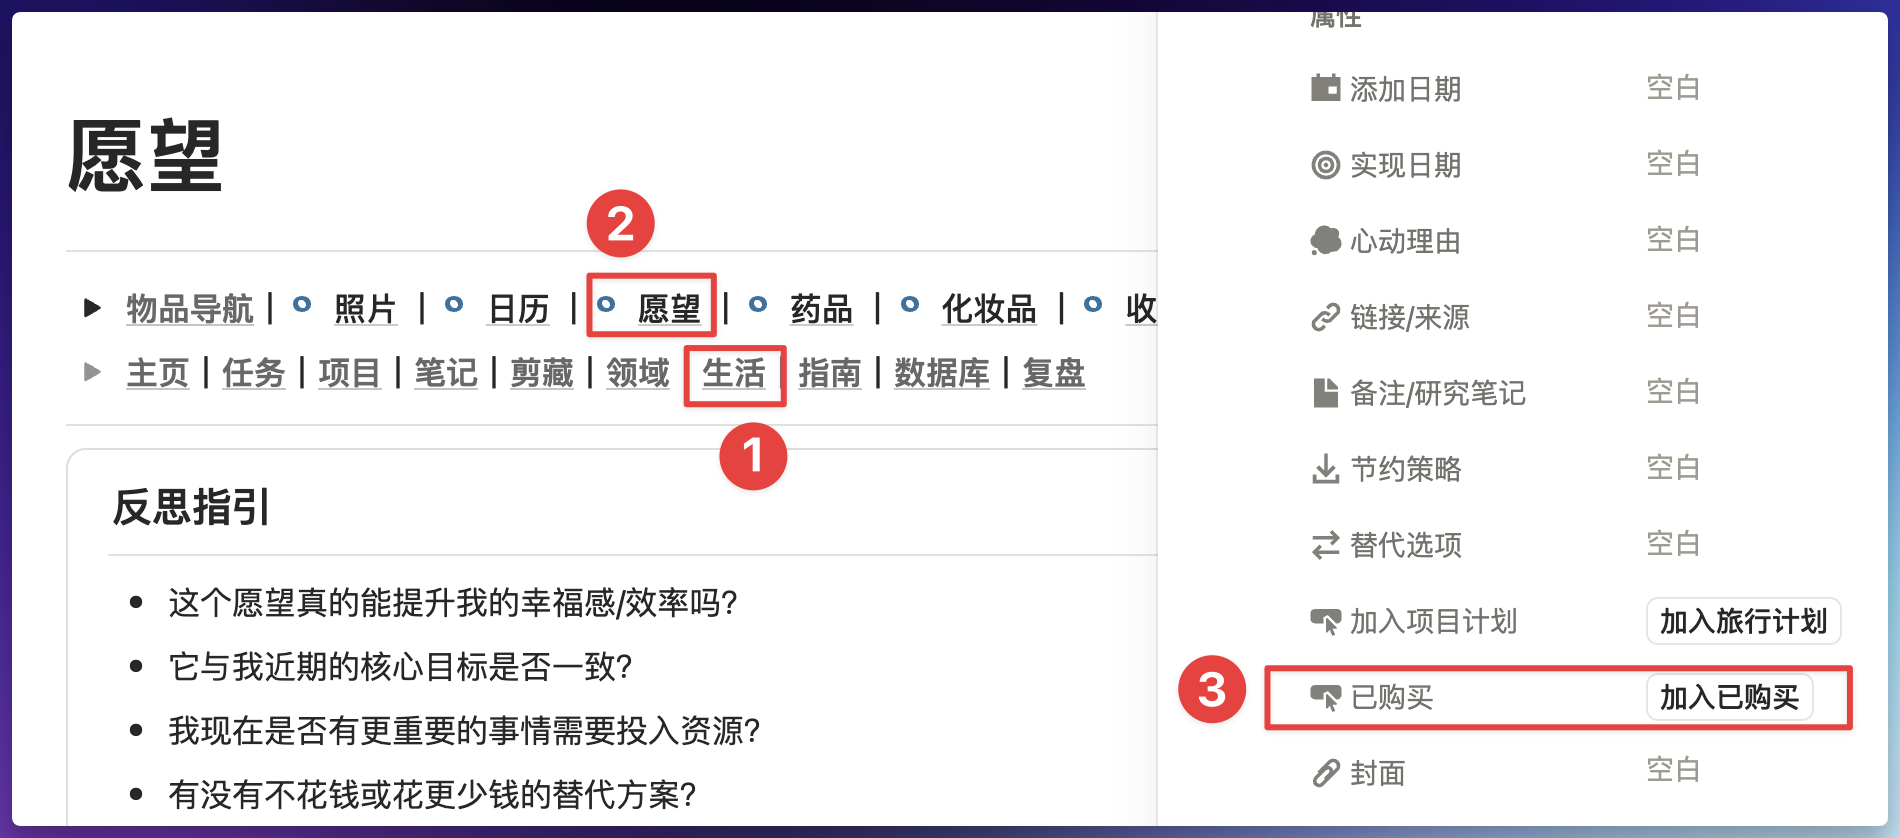
If clicking this button shows an error, one of the steps in this button might have an error
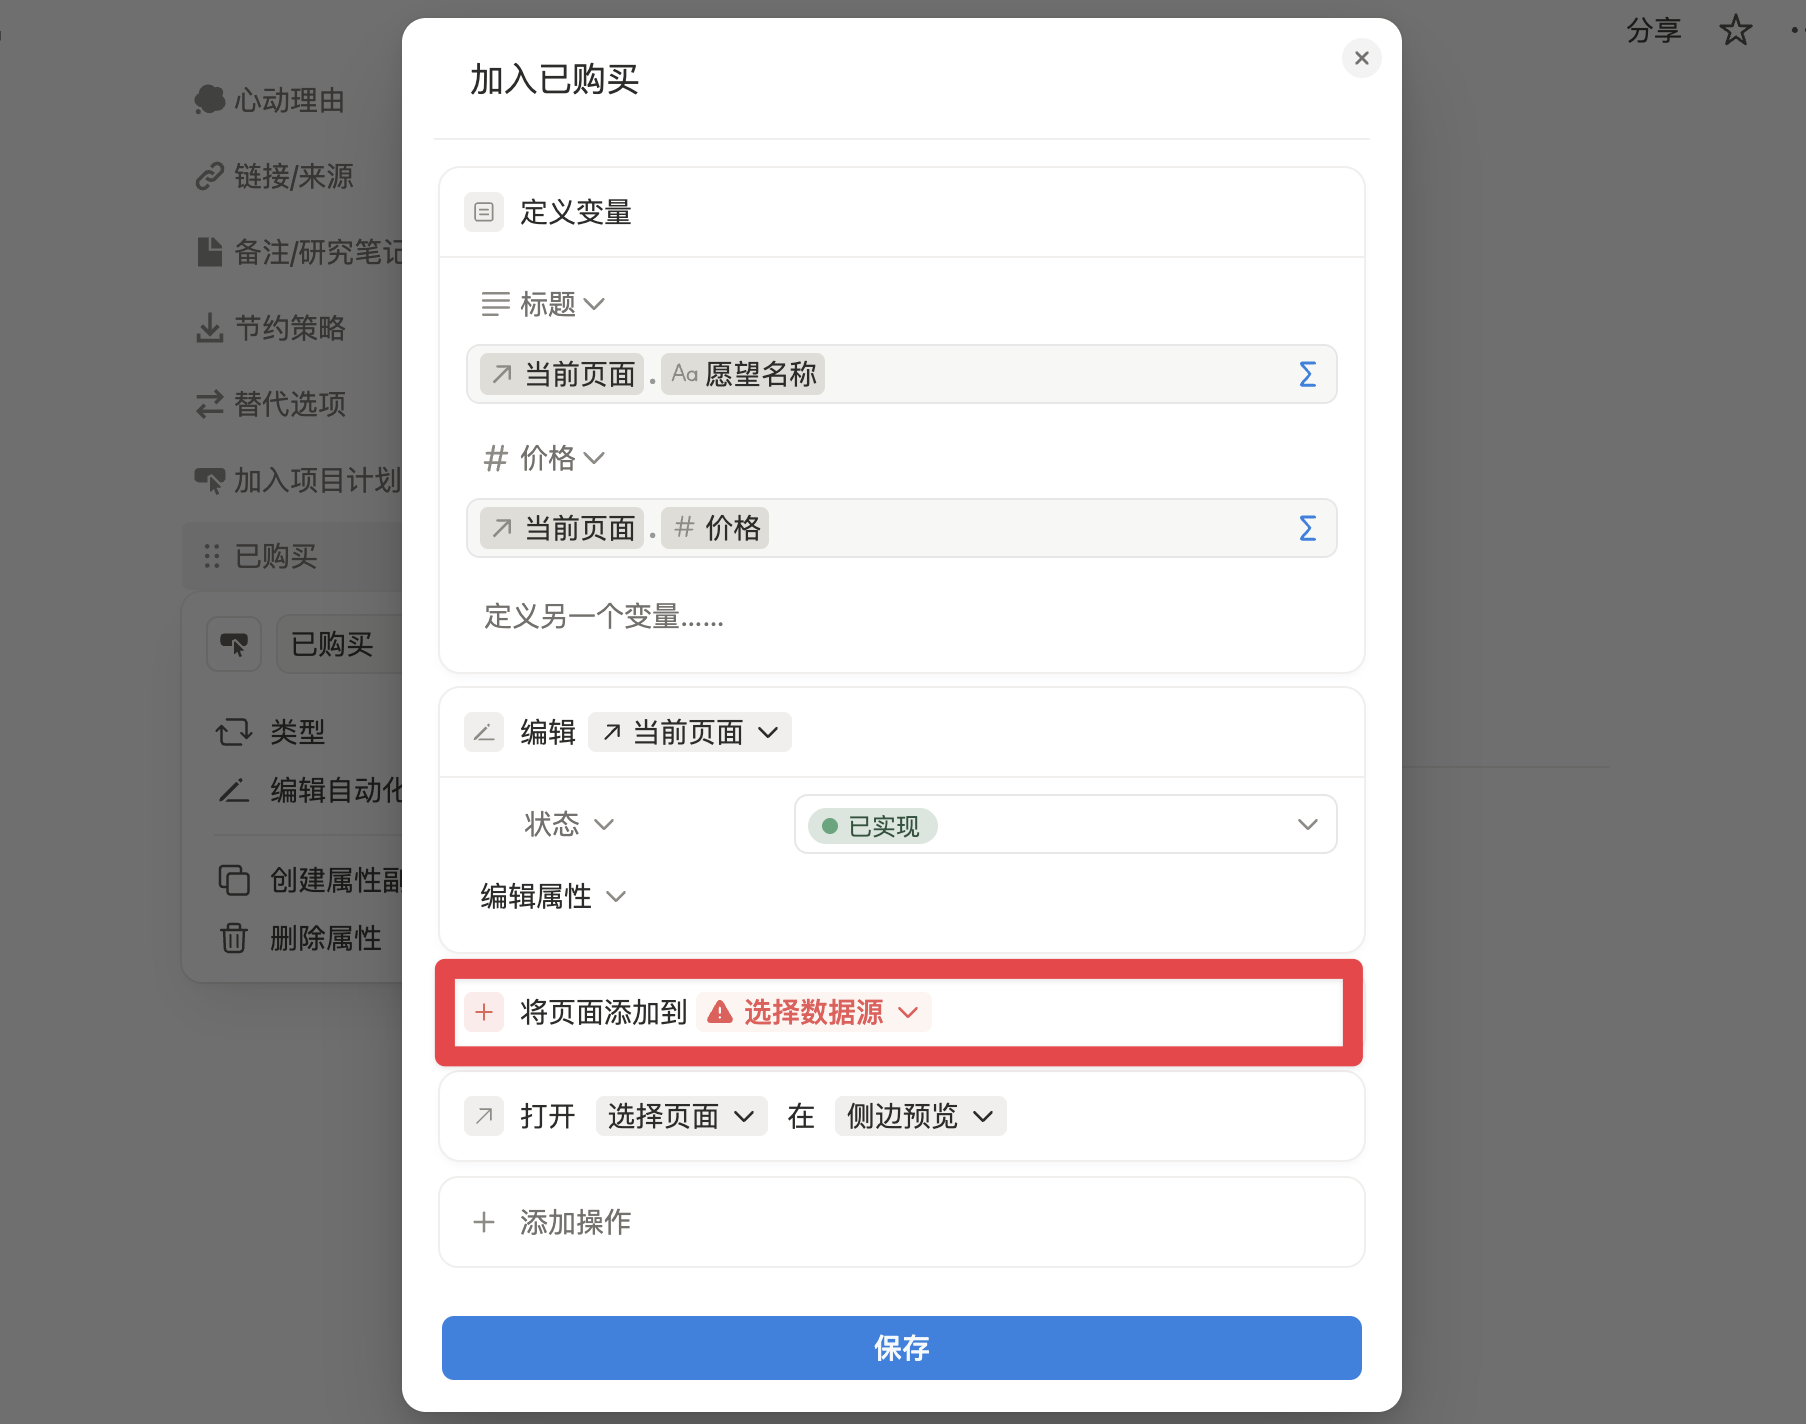
 Button error **Solution** Re-edit this button following the method shown below Re-edit button *** ## Can't Access Notion? If the Notion website or app suddenly becomes inaccessible, it might be a Notion service outage — not an issue with your network or template. * Check the [Notion Status Page](https://www.notion-status.com/) to see if services are currently operational * If it's not an official outage, refer to [Notion Access Speed Solutions](/docs/notion-download#notion-access-speed) *** **Issue not resolved?** Join the [Lark Community](/docs/faq/support#join-feishu-group) for human support. --- # Asset Inventory (https://21notion.com/en/docs/lifestyle/assets-inventory) ## Module Introduction You bought that keyboard for 500 yuan, and after two years it's sitting idle in a corner. What's its daily cost? This module will tell you the answer. Record the purchase date and price of each item, and the system will automatically calculate its daily cost and days of use. Three months later when you want to buy a new keyboard, open this and you'll know more clearly: you haven't gotten your money's worth from the last one yet. This isn't about making you a miser—it's about giving you more control over every spending decision. ![](https://pic.eryinote.com/PicGo/202510301543300.png) > 🎯 **Asset Inventory** is just one of many built-in features in the FLO.W template. You'll also get task management, project tracking, a notes system, and more — one template covering every aspect of work and life. > >
> > [👉 View full features & pricing](/pricing) --- # Gaming Tracker (https://21notion.com/en/docs/lifestyle/gaming-tracker) ## Module Introduction Completing a game is like finishing an adventure, but these experiences shouldn't fade away like mist. This module records your game library, completion progress, game reviews, and spending. Two years from now when a friend asks "Is this game worth playing?", you won't need to struggle to remember—open this and find your complete gaming history. Every completed game is a unique journey worth recording and savoring. ![](https://pic.eryinote.com/PicGo/202510301544388.png) > 🎯 **Gaming Tracker** is just one of many built-in features in the FLO.W template. You'll also get task management, project tracking, a notes system, and more — one template covering every aspect of work and life. > >
> > [👉 View full features & pricing](/pricing) --- # Habits Tracker (https://21notion.com/en/docs/lifestyle/habits-tracker) ## Module Introduction Changing a habit is like pushing a boulder up a mountain—the hardest part isn't lack of strength, but not seeing how far you've come. This module turns every day's persistence into visible color blocks with heatmaps. Reading, exercise, early bedtime, vocabulary memorization—whatever habit you want to build, open this to see your competition with yesterday. When the calendar fills with green squares, that sense of achievement becomes the best motivation to keep moving forward. ![](https://pic.eryinote.com/PicGo/202510301540424.png) > 🎯 **Habits Tracker** is just one of many built-in features in the FLO.W template. You'll also get task management, project tracking, a notes system, and more — one template covering every aspect of work and life. > >
> > [👉 View full features & pricing](/pricing) ## FAQ **Question** Because of high-frequency use, is there a way to check in as soon as I open Notion? This would shorten the check-in path and be more efficient. **Answer** Create a **Button** where you want quick check-in access. The basic logic of the button is as follows: * After clicking the button, create a page in a **Database** named **FLO.W Habits Tracker DB** * Edit the **Date** Property of this **new page** and set it to **Trigger Date** * Edit the **Related Habit** Property of this **new page** and link it to **the habit page you want to check in** Button logic requires some learning and research. If you don't know how to operate it, you can start a new topic in the group to ask. **Question** I clicked the **Check-in** button multiple times, causing errors in **Check-in Statistics**. How do I remove duplicate check-in records? **Answer** Find the specific check-in target at the location shown below, then delete the duplicate date pages. Delete duplicate check-in records diagram **Question** Does every check-in create a new page? Won't this result in a huge pile of pages over time, affecting database loading efficiency and stability? **Answer** 1. The pages displayed here are limited and will collapse after a certain number. Also, if you really don't want to see them, you can hide these Properties. 2. The check-in mechanism does generate a new page each time, but these pages won't be mixed with your Notes—they're in an independent Database. Also, since check-in pages are blank, they won't pollute search results. 3. The performance overhead of the check-in statistics formula is minimal and won't consume too much performance when loading. 4. Notion formulas only run when loaded—meaning if you don't look at it, it essentially doesn't exist. --- # Lifestyle Trackers (https://21notion.com/en/docs/lifestyle) import { CheckCircle, TvMinimalPlay, Box, Joystick, TicketMinus } from 'lucide-react'; Life is more than just work and study. FLO.W's lifestyle tracking modules help you track those easily forgotten but equally important life details—habit building, spending records, entertainment time. > 💡 **Module Positioning**: These features are FLO.W system's "lifestyle amenities"—you can enable them as needed. They are independent from core Task, Project, and Note modules and won't add complexity to daily use. ## Module Overview } title="Habits Tracker" href="/docs/lifestyle/habits-tracker"> Record daily persistence with heatmaps, make change visible } title="Movie Tracker" href="/docs/lifestyle/movie-tracker"> Record viewing experiences, track want-to-watch and watched } title="Asset Inventory" href="/docs/lifestyle/assets-inventory"> Calculate daily costs, gain more control over spending } title="Gaming Tracker" href="/docs/lifestyle/gaming-tracker"> Record completion progress, savor your gaming journey } title="Subscription Manager" href="/docs/lifestyle/subscription-tracker"> Track subscription fees, automatic expiry reminders ## Usage Tips The design philosophy of these modules is "**low-friction recording**"—don't record for the sake of recording, but quickly jot things down when they actually happen. * **Habits Tracker**: Start with 1-3 habits you most want to change—too many will be hard to sustain * **Movie Tracker**: Spend 30 seconds writing a review after watching a movie—three months from now you'll thank yourself * **Asset Inventory**: Record when buying new things, have data to reference when making spending decisions * **Gaming Tracker**: Record your thoughts after completion—archive your gaming journey for yourself * **Subscription Manager**: Log all auto-charging services, set reminders to avoid waste --- # Movie Tracker (https://21notion.com/en/docs/lifestyle/movie-tracker) ## Module Introduction Movies and series you've watched shouldn't be consumed like fast food. This module helps you record every viewing experience: your rating, watch time, actors and directors who moved you. More importantly, it can remind you of new releases you're anticipating and updates to shows you're following. From "want to watch" to "watched," from "tracking" to "savoring," all your viewing memories are traceable. Three months from now, when a friend asks "what's good to watch lately," you won't need to struggle to remember—open this and find the answer. ![](https://pic.eryinote.com/PicGo/202510291635597.png) > 🎯 **Movie Tracker** is just one of many built-in features in the FLO.W template. You'll also get task management, project tracking, a notes system, and more — one template covering every aspect of work and life. > >
> > [👉 View full features & pricing](/pricing) ## FAQ Gallery poster effect: ![](https://pic.eryinote.com/PicGo/202510301332351.jpeg) To display posters in the gallery, there are two methods. 1. Paste the poster directly into the page content, then in **Database Settings - Layout**, set **Card Preview** to **Page Content** ![](https://pic.eryinote.com/PicGo/202510301337679.png) 2. Upload the poster to a **File** Property in the Database, First, you need to create a **File** Property for the Database to upload posters ![](https://pic.eryinote.com/PicGo/202510301339584.png) Then set **Card Preview** to this File Property ![](https://pic.eryinote.com/PicGo/202510301341562.png) ![](https://pic.eryinote.com/PicGo/202509122103287.png) --- # Subscription Manager (https://21notion.com/en/docs/lifestyle/subscription-tracker) ## Module Introduction ChatGPT, Notion, various memberships—each feels like just a few dozen yuan per month, but by year-end it could add up to several thousand. These auto-charging subscriptions are like boiling a frog in warm water, making your money slip away unnoticed. This module tracks all subscription services and automatically reminds you before expiry whether to renew or cancel. It's not about making you reluctant to spend, but about letting you clearly know that every yuan is spent on what you truly need. ![](https://pic.eryinote.com/PicGo/202510301545156.png) > 🎯 **Subscription Manager** is just one of many built-in features in the FLO.W template. You'll also get task management, project tracking, a notes system, and more — one template covering every aspect of work and life. > >
> > [👉 View full features & pricing](/pricing) --- # Area Properties Guide (https://21notion.com/en/docs/properties/area) ## Primary Area Properties * **Area Goal**: What you most want to achieve in this direction, equivalent to setting a long-term goal for yourself, telling yourself "where I'm heading." * **Area Description**: Used to write your thoughts and philosophy about doing this. Why do it? What value do you want to create? Sometimes it's easy to get lost in the process—looking back at this passage can help you rediscover your original intention. * **Core Directions**: Breaking down the big goal into several actionable paths, turning "goal" into "how to do it." * **Area Gap**: Self-diagnosis—what's missing now? Not enough resources? Not enough time? Or blind spots in understanding? Write it down to remind yourself what weaknesses to address. * **Area Calibration**: Timing points for periodic review. For example, check quarterly: is the goal still right? Should the direction be adjusted? Prevents working hard but going off track. Reference: ![](https://pic.eryinote.com/PicGo/20251129230337004.png) The overall logic is: **Set goal first** → **Clarify why** → **How to do it** → **What's missing** → **Periodic review** --- # Clipper Properties Guide (https://21notion.com/en/docs/properties/explore) ## Design Logic The Explore Database is the unified database in the FLO.W Template for managing all "input-type content"—whether books, articles, videos, courses, or posts, they all converge here. The core reasons for this design: * **Unified Entry**: No need to switch between multiple Databases—all to-read/reading/completed content is in one place * **Flexible Categorization**: Distinguish types through the "Content Format" Property, combined with view filtering—keeps data unified while allowing on-demand viewing * **Connected Flow**: Reading is not an isolated behavior; it has relationships with Tasks, Projects, Notes, and Areas. These connections make knowledge truly flow *** ## Property Guide and Usage Methods ### 📌 Basic Information Properties | Property | Description | Usage Method | | ------------------ | ----------------------- | ------------------------------------------------------------------- | | **Name** | Content title | Fill in book title, article title, video name, etc. | | **Content Format** | Content type | Select: Book / Article / Video / Course / Post | | **Reading Status** | Current progress status | Not Started → In Progress → Completed | | **URL** | Content source link | Fill in the URL of original text/video/course for easy backtracking | | **Cover** | Content cover image | Upload or paste cover image to make list view more intuitive | *** ### 📖 Book-Specific Properties The following Properties are only meaningful when "Content Format = Book": | Property | Description | Usage Method | | ---------------------- | ------------------------ | ------------------------------------------------------------------------------------------ | | **Total Pages** | Book total pages | Fill in a number, used to calculate reading progress | | **Pages Read** | Current pages read | Update after each reading session, system automatically calculates progress percentage | | **Reading Progress** | Auto-calculated progress | Formula Property, no manual filling needed, displays "Pages Read ÷ Total Pages" | | **Word Count** | Book total word count | Optional fill, some ebooks display word count | | **Douban Rating** | Rating on Douban | Fill in 0-10 number, helps judge if worth reading | | **Book List Category** | Book topic category | Link to Book List Database, such as "Productivity" "Psychology" "Business" etc. | | **Related Excerpts** | Highlight passages | The excerpts Database embedded in the page will automatically link, no manual setup needed | Related use case: [How to read a book with FLO.W Template](/blog/book-reading) ### 🎯 Reading Intention Properties | Property | Description | Usage Method | | ----------------- | ----------------------------------- | ------------------------------------------------------------------------------------------------------------------------ | | **Why Read** | Reading motivation and expectations | Before starting, write down: What problem do I want to solve? What do I want to learn? This helps maintain reading focus | | **After Reading** | Overall feeling after reading | After completion, briefly record: What was my biggest takeaway from this book/article? | *** ### 🔗 Relation Properties These Properties create connections between reading content and other parts of the system: | Property | Description | Usage Scenario | | ------------------- | ------------------------------------- | --------------------------------------------------------------------------------------------------------------------- | | **Area / sub-Area** | Knowledge area the content belongs to | Which area does this content belong to? After linking, you can see all related content in the Area page | | **From** | Author/blogger/channel | Link to People Database, convenient for tracking all works by a certain author | | **Related Task** | Triggered to-dos | What needs to be done after reading? Link directly to Tasks | | **Related Project** | Project it belongs to | Which project is this reading for? After linking, the project page will display all reference materials | | **Related Note** | Extended notes | What notes did you write based on this content? Bidirectional link, knowledge won't be scattered | | **Reading Report** | Periodic reading summary | Automatically links to reading report, no manual operation needed, used to generate monthly/annual reading statistics | *** ### ⚙️ System Properties | Property | Description | Notes | | ------------------- | -------------------------- | --------------------------------------------------------------------------------------- | | **Created Time** | Page creation time | Auto-recorded, no manual filling needed | | **Completion Date** | Date marked complete | Auto-filled when clicking "Complete" button | | **Complete** | One-click complete button | After clicking, automatically changes status to "Completed" and records completion date | | **URL Icon** | Display icon based on link | Formula Property, automatically extracts website icon | | **Site Extraction** | Extract domain from link | Formula Property, displays content source site | --- # Note Properties Guide (https://21notion.com/en/docs/properties/note) ## Note Types Focusing on the essential purpose of notes, "questions" need answers, "processes" mean they can be reused—try to use limited tags to cover your daily note types, so you can quickly find where to store a note when it's created. Because everyone's daily note types are different, the "types" here are highly customizable, but we don't recommend setting too many note types, otherwise it will increase the burden of categorization. In the FLO.W system, appropriate fuzziness is allowed, because besides "Note Type" serving as a categorization dimension for notes, there are more methods and perspectives to help you find the notes you need. **Current six preset note types** | Type | Description | | -------------------------------------------- | ---------------------------------------------------------------------------------------------------------------------------------------------------------------------------------------------------------------------------------------------------- | | **Exp - Experience / Summary / Review** | Used to record lessons learned from practice (Projects, Tasks, life experiences), in-depth research summaries on complex topics, or periodic personal/work review reflections. This type of note is key to knowledge internalization and refinement. | | **Log - Journal / Process / Experience** | Used to record daily diaries, work logs, specific processes of project progress, important personal experiences or observational discoveries. | | **Ask - Confusion / Unknown / Problem** | Used to record specific questions arising in learning, work, or life, problems needing further investigation, challenges or difficulties faced | | **How - Method / Process / Guide** | Used to record specific operation methods, workflows, SOPs (Standard Operating Procedures), skill acquisition guides or tutorials | | **Idea - Thought / Inspiration / Viewpoint** | Used to quickly capture any fleeting inspiration, initial ideas, unique personal viewpoints or innovative solutions | | **Ref - Resource / Excerpt / Tool** | Used to store valuable external resource links, curated excerpts from articles/books, recommended tool lists, or other material fragments worth saving. | ## Outgoing Links and Incoming Links In the FLO.W system's note page, you can see the Outgoing Links and Incoming Links options in the Related module. Their usage is the same—both let you link notes with other notes. * Outgoing links are active associations—it's me remembering which notes are related to this one * Incoming links are passive associations—it's me being linked by which notes This mechanism is to build a sense of direction between notes ![](https://pic.eryinote.com/PicGo/202509130238999.png) ### What is a Sense of Direction It refers to the ability to clearly perceive the contextual structure, causal relationships, or development paths of information starting from a certain note. That is, not just knowing which related notes exist, but also knowing **which is the starting point, which is the extension, which is the summary, which is the supplement** between them. ### The Nature of Outgoing and Incoming Links * **Outgoing Links**: Current note actively mentions or cites other notes. Means "I depend on it, I explain it, I extend viewpoints based on it." * **Incoming Links**: Other notes mention or cite the current note. Means "who pays attention to it, for which topic is it the foundation or source." ### How to Use Outgoing and Incoming Links * **View Outgoing Links** → Get "what it cites," suitable for extended reading (such as progressive reading, concept breakdown) * **View Incoming Links** → Get "who cites it," suitable for review and summary (such as finding upper-level structures, summary-type notes) ## Parent and Child ## Sibling Notes In the Note Management Database, with the "Sub-items" feature enabled, assuming the following note structure exists * Parent note * Child note A * Child note B * Child note C * … Then when you visit "Child note A," "Child notes B, C, D…." will be displayed in the "Sibling Notes" section ![](https://pic.eryinote.com/PicGo/202509130239717.png) ## Topic Notes When a note has child notes, we can call it a topic note. ### Topic Note Implementation Logic 1. Enable the "Sub-items" feature of the **Note Database**. If already enabled, ignore this. The location of the **Sub-items** feature may vary ![](https://pic.eryinote.com/PicGo/202509130240248.png) 2. Use a Formula to determine whether a note is a "topic note" `empty(prop("Sub-items")).not() or empty(prop("Parent")).not()` If the result is true, the Formula will automatically check the box Then filter all results to this page ![](https://pic.eryinote.com/PicGo/202509130240281.png) ### How to Add Child Notes Please refer to: [Parent and Child](#parent-child) ### Topic Note Application Example ![](https://pic.eryinote.com/PicGo/202509130241280.png) ## Attention Level **Use "Attention Level" to mark note content that needs attention "right now"** Only when a note's "Completion Status" is in "`In Progress`" do you need to allocate attention to it, but normally when there are enough notes, if there's only the "In Progress" category, it will be overloaded, so further focus is needed—use "Attention Level" to mark notes that currently need more attention * Active:Note content being processed in the last few days * Waiting:Blocked and temporarily on hold, waiting for more material to further improve and supplement * Paused:Current note is half-done and not yet completed, completion is necessary but temporarily impossible and low priority, can be paused ![](https://pic.eryinote.com/PicGo/202509130242555.png) **Supplement** * If a note is not in "In Progress" status, there's no need to set "Attention Level" * If you're a Notion paid user, you can set an Automation to automatically cancel "Attention Level" ![](https://pic.eryinote.com/PicGo/202509130242499.png) ## Completion Status Every note has three life cycles: Not Started, In Progress, Completed, used to indicate my processing progress * Not Started:Only note title or rough idea, record first to prevent loss * In Progress:Currently being edited * Completed:The content covered by the note title is finished ![](https://pic.eryinote.com/PicGo/202509130243444.png) **Supplement** * Don't overly pursue precise categorization * Just follow your first instinct to set the note's Completion Status ## Frequently Used Filter for frequently used notes for quick access and quick recording. For example, commonly used Prompts, frequently referenced manuals, processes, guides, etc. ![](https://pic.eryinote.com/PicGo/202509130244239.png) Subsequently, these notes will appear in the position shown below ![](https://pic.eryinote.com/PicGo/202509130244504.png) ## Random Sort **Property Location** This Property currently exists in the following locations: 1. **Note Database** 2. **Project Management - Content Creation - Topic Library** **Property Explanation** * This is an auto-calculated Formula, no manual intervention needed * Can automatically generate a string of random numbers based on the current page's **Created Time** **Property Usage** * Sort by the **Random Sort** Property (ascending or descending both work), and you can achieve random browsing of Database pages **Function Scenario** Randomly sort notes or topics, etc., to achieve random review of note content, helping you discover (stumble upon) forgotten old notes, rather than viewing by creation time or alphabetical order --- # Project Properties Guide (https://21notion.com/en/docs/properties/project) ## Prerequisites and Dependencies ### Property Explanation The current FLO.W system has a basic framework with "Area" as the top-level design. Specifically, you can see this article in the [Template Manual](/docs): [Understanding Areas](/docs/basic-feature/area). * Area * sub-Area * Project A * Project B * Task 1 * Task 2 Under this framework design, all projects are parallel to each other, unless they're all linked to the same **sub-Area** For example: * sub-Area - Python Data Analysis * Project A * Project B But this way, some special situations may arise. ### Possible Scenarios import { Accordion, Accordions } from 'fumadocs-ui/components/accordion'; Sometimes, the granularity of a "Project" is too large, making it impossible for us to start taking action. For example, you want to create a project called "Learn Notion Course," but this goal is too massive and vague. You might want to break it down into smaller, manageable units, such as: * Learn Notion Course (parent project) * Learn Chapter 1: Basics (sub-project) * Learn Chapter 2: Database Deep Dive (sub-project) * Learn Chapter 3: Advanced Formulas (sub-project) Here, you might feel that "Learn Chapter 1" is complex enough that it needs to link to its own Tasks and Notes, so it can't just be a simple Task—it should be a "sub-project." Some projects have strict sequential relationships—you must complete one before starting the next. For example: 1. You must first complete the project "Complete APP UI Design." 2. Then you can start the project "Start APP Frontend Development." In the current parallel structure, we can't clearly express this dependency where "A is B's prerequisite." To address both needs above, you can use the project's Prerequisites and Dependencies feature ![](https://pic.eryinote.com/PicGo/202509121952880.png) 1. This feature is an upgrade benefit of \[Advanced Edition · Major Version Free Upgrade] 2. If you're an Advanced Edition user, please find the update method and detailed instructions in the group announcement 3. Basic Edition / Professional Edition upgrade to Advanced Edition method → [Version Upgrade](/docs/faq/support) ## Related Items Last Edited Time In the FLO.W system, you'll see a Property called "Related Items Last Edited Time" in many Databases, for example: ![](https://pic.eryinote.com/PicGo/202509122331996.png) The basic purpose of this Property is to display the last edited time of all pages associated with the current page. Notion's built-in "Last Edited Time" only tells you when **this page itself** was last modified. The "Related Items Last Edited Time" Property automatically checks all **content linked to this page** (such as related Tasks, Projects, child notes, parent notes, outgoing links, incoming links, etc.), then tells you which was the most recent edit time among all this content. When you link an old note written months ago to a new project, this old note's **`Related Items Last Edited Time`** will immediately update to today. This means it has a chance to reappear in your view. This mechanism helps you connect past accumulated wisdom with current work, creating unexpected chemistry. --- # Task Properties Guide (https://21notion.com/en/docs/properties/task) import { Accordion, Accordions } from 'fumadocs-ui/components/accordion'; This document will provide a detailed explanation of each Property in the FLO.W Template's Task Database, helping you better understand and use the task management features. ## Task Types: Schedule vs Todo | **Feature** | **📅 Schedule (Appointment)** | **✅ Todo (Assignment)** | | ------------------- | ----------------------------------------------------- | ---------------------------------------------- | | Time Characteristic | Fixed time point (3 PM meeting) | Deadline (complete by Friday) | | Flexibility | Not adjustable (meeting room booked) | Self-arrangeable (based on status) | | Common Scenarios | Meetings, flights, weddings, birthdays | Writing reports, shopping, picking up packages | | Notes | Must arrive on time, ensure time slot isn't disturbed | Time flexible, pay attention to deadline | ## Schedule Date vs Completion Date Many people confuse these two properties. The key difference is: * **Schedule Date** = when you **plan** to do it (expectation) * **Completion Date** = when you **actually** finished it (result) For example: you plan to write an article from Monday to Friday, so **Schedule Date** is Mon \~ Fri. You finish it on Wednesday, so **Completion Date** is Wednesday. ## Next Action Set an immediately executable action for the current task, so that next time you see the current task, you can execute it without any thinking, then rely on inertia to further break down and complete this task ## Sibling Tasks **Sibling Tasks** is a formula property that automatically lists **other tasks under the same project**, helping you quickly see the progress of related work. **Display rules:** * Finds all tasks under the same project via the **Project Relation**, excluding the current task * Sorted by creation date (newest first), up to 20 entries * Each task shows: task name + creation date (blue) + current status (color-coded) * Green: Completed * Blue: In Progress * Red: Todo / On Hold / Collect / Abandoned **Use case:** When working on a task within a project, you can see the status of other tasks in the same project without switching to the project page. > This is an [Advanced Edition update](/docs/faq/support#upgrade-pricing) exclusive feature. ## Task Reminders ![](https://pic.eryinote.com/PicGo/202511061156806.png) **Reason:** You've filled in **Completion Date**, but **Status** is not yet **Completed** or **Abandoned**. * If the task is actually complete: Change **Status** to **Completed**. * If the task was abandoned: Change **Status** to **Abandoned**. You can keep the Completion Date as a record. * If the Completion Date was filled by mistake: Clear the **Completion Date**. This means the task has passed its deadline but is not yet completed. * **Overdue N days**: The due date has passed by N days (calculated by day). * **Overtime X hours Y minutes**: A specific time was set in the schedule, and that time has passed today (calculated by hours/minutes). * Solution: Complete the task, change **Status** to **Completed**, and fill in **Completion Date**. **Reason:** The **Status** field is empty, but **Completion Date** has been filled in, so the system infers the task is complete. * Solution: Change **Status** to **Completed**, and the prompt will switch to normal completion info. * No **specific time** is set in the schedule. When the schedule only has dates (all-day events), the system only prompts by **day**. * Solution: Add a specific time to the due date in **Schedule Date** (e.g., 17:00), and it will show hour/minute-level prompts. * "Completed on Time" requires the completion time and deadline to be exactly the same, which rarely happens in practice. * Seeing "Early" or "Overdue" completion prompts is perfectly normal. * **Pending Schedule**: The task has no schedule set, and status is Collect/On Hold/Todo. * **In Progress (no schedule)**: Status is already **In Progress**, but no schedule has been set. * Solution: Set at least a due date. If not arranging for now, you can put it **On Hold**. * **Completion Date** is empty or inconsistent with the actual time. * Solution: Fill in the actual completion time in **Completion Date**. Once status is **Completed**, the corresponding completion info will display. * When the schedule's start or due date is tomorrow, the system prioritizes showing a "Starts Tomorrow / Due Tomorrow" reminder. * If you want a more precise countdown, set a specific time in the schedule. 1. **Is status correct?** Select **Completed** if done, **Abandoned** if dropped. 2. **Is schedule empty?** If empty, it will show **Pending Schedule**. 3. **Need precise time?** Add a specific time to the schedule; all-day events default to day-level prompts. 4. **Completion Date**: Fill in promptly after completion; correct promptly if filled by mistake. * In Notion, if only a date is set without a specific time, the time defaults to 00:00. * When calculating time differences, the system uses 00:00, which may differ from your intuition. ## Task Status Usage Guide In the FLO.W system, task status is used to mark which life cycle stage a task is in. Understanding the meaning of each status helps you manage task flow more efficiently. ![](https://pic.eryinote.com/PicGo/202511061154566.png) 🟣 **Collect**: Ideas not yet clarified or items to be organized When an idea suddenly pops into your mind, but what exactly to do or whether to do it isn't certain yet, record it in the **Collect** status. **Next Action**: Periodically review tasks in **Collect**, decide whether to convert to **Todo**, or directly delete/abandon. *** 🟢 **Todo**: Clear and confirmed tasks to do When a task already has clarity on "what it is," "why do it," "how to do it," just hasn't reached the execution time point yet, mark as **Todo**. **Next Action**: When ready to start executing, change status to **In Progress**. *** 🟤 **On Hold**: Not doing for now, but may restart in the future When a task cannot continue progressing for some reason, but you don't want to completely abandon it, mark as **On Hold**. **Difference from "Abandoned"**: On Hold is "pause," Abandoned is "terminate." Tasks on hold remain in the system, and you can periodically review whether to reactivate. 🔵 **In Progress**: Task currently in progress As long as you've started working on this, or are starting it today, mark as **In Progress**. This is your current work focus. **Recommendation**: Don't have too many tasks in **In Progress** status simultaneously—suggest controlling within 3-5 to maintain focus. **Next Action**: After completion, change status to **Completed**; if temporarily can't continue, can change back to **Todo** or **On Hold**. ⚫ **Completed**: Tasks already finished After a task achieves its goal, mark as **Completed**. This is the normal ending of a task. **System Behavior**: Completed tasks will automatically archive, and you can view statistics of completed tasks in review reports. *** 🟠 **Abandoned**: Tasks confirmed no longer to be executed When you clearly decide not to do a task, mark as **Abandoned**. **Difference from "On Hold"**: Abandonment is a definite ending, meaning this task won't appear in your workflow again. ### Practice Recommendations **Daily Usage Flow**: 1. Anytime record ideas in **Collect** 2. Daily or weekly organize **Collect**, convert clear tasks to **Todo** 3. Daily select tasks from **Todo**, change to **In Progress** when starting 4. Mark as **Completed** after finishing, or if can't continue can **On Hold** or **Abandon** **Common Pitfalls**: * ❌ Mark all tasks as **In Progress** → leads to inability to focus * ❌ Use **Collect** as a trash can → need periodic cleanup, otherwise loses meaning * ❌ Afraid to use **Abandoned** → promptly abandoning worthless tasks is key to keeping system clean **Core Principle**: The essence of status is to help you **see the right tasks at the right time**. Tasks with different statuses will appear in different views, keeping your workflow clear and efficient.