# Note Management (https://21notion.com/en/docs/basic-feature/note-taking)

import { FileText, Link, GitBranch, Users, FolderGit, Eye, Clock, Star, Shuffle } from 'lucide-react';

This document will teach you how to create, edit, and organize notes in the FLO.W Template to build your knowledge management system.

## Add a Note

<Tabs items={['Bilibili', 'YouTube']}>
  <Tab value="Bilibili">
    <BilibiliVideo url="//player.bilibili.com/player.html?isOutside=true&aid=115223889447103&bvid=BV1HtpezrEWC&cid=32460508540&p=8" width={560} height={315} autoplay={false} />
  </Tab>

  <Tab value="YouTube">
    <YoutubeVideo url="https://www.youtube.com/embed/6yYWWN9lZoc" width={560} height={315} />
  </Tab>
</Tabs>

## Note Properties Description

Learn about the configuration and usage of various Properties in the note system:

<Cards>
  <Card icon={<FileText className="text-blue-500" />} title="Note Type" href="/docs/properties/note#note-types">
    Six preset note types: Exp, Log, Ask, How, Idea, Ref
  </Card>

  <Card icon={<Link className="text-green-500" />} title="Outgoing and Incoming Links" href="/docs/properties/note#outgoing-incoming-links">
    Build sense of direction and associations between notes
  </Card>

  <Card icon={<GitBranch className="text-purple-500" />} title="Parent and Child" href="/docs/properties/note#parent-child">
    Create hierarchical structure and organization relationships for notes
  </Card>

  <Card icon={<Users className="text-orange-500" />} title="Sibling Notes" href="/docs/properties/note#sibling-notes">
    View related notes at the same level
  </Card>

  <Card icon={<FolderGit className="text-indigo-500" />} title="Topic Notes" href="/docs/properties/note#topic-notes">
    Manage topic content with child notes
  </Card>

  <Card icon={<Eye className="text-cyan-500" />} title="Attention Level" href="/docs/properties/note#attention-level">
    Mark note content that needs attention
  </Card>

  <Card icon={<Clock className="text-red-500" />} title="Completion Level" href="/docs/properties/note#completion-status">
    Track the lifecycle status of notes
  </Card>

  <Card icon={<Star className="text-yellow-500" />} title="Common Notes" href="/docs/properties/note#frequently-used">
    Quick access and record common content
  </Card>

  <Card icon={<Shuffle className="text-pink-500" />} title="Random Sort" href="/docs/properties/note#random-sort">
    Randomly review note content
  </Card>
</Cards>

## Create Notes in Tasks

<Tabs items={['Bilibili', 'YouTube']}>
  <Tab value="Bilibili">
    <BilibiliVideo url="//player.bilibili.com/player.html?isOutside=true&aid=115223889447103&bvid=BV1HtpezrEWC&cid=32460509127&p=9" width={560} height={315} autoplay={false} />
  </Tab>

  <Tab value="YouTube">
    <YoutubeVideo url="https://www.youtube.com/embed/H1I6ClDA8Ro" width={560} height={315} />
  </Tab>
</Tabs>

## Diary Creation Methods

### Diary Storage Location

Follow the path shown below, access the Template navigation bar, and enter the diary module. This will centrally store all diaries you create

![Opening the diary module from the notes navigation](https://pic.eryinote.com/PicGo/202511111952993.png)

If you want your created "Diary" to appear in this Database, please ensure your title includes the word "Diary".

![Filtering the diary database by title containing diary](https://pic.eryinote.com/PicGo/202511112001855.png)

### Diary Definition

According to the [Note Type](/docs/properties/note#note-types) definition, "Diary" belongs to the "Log" category.

Diaries are used to simply and directly record daily experiences or feelings. They don't need deliberate refinement and summary, only to authentically capture the "moment". Their value lies in preserving unadorned records, providing material for future review, reflection, or simple reflection.

![Diary entry marked as log type for daily experiences](https://pic.eryinote.com/PicGo/202509130208939.png)

### Diary Creation Methods

Please note that in the 3 methods below, the description of "Note" specifically refers to "Notes" that exist in the "Note Database"

<Steps>
  <Step>
    <h4>
      Method 1: Create through process
    </h4>

    <p>
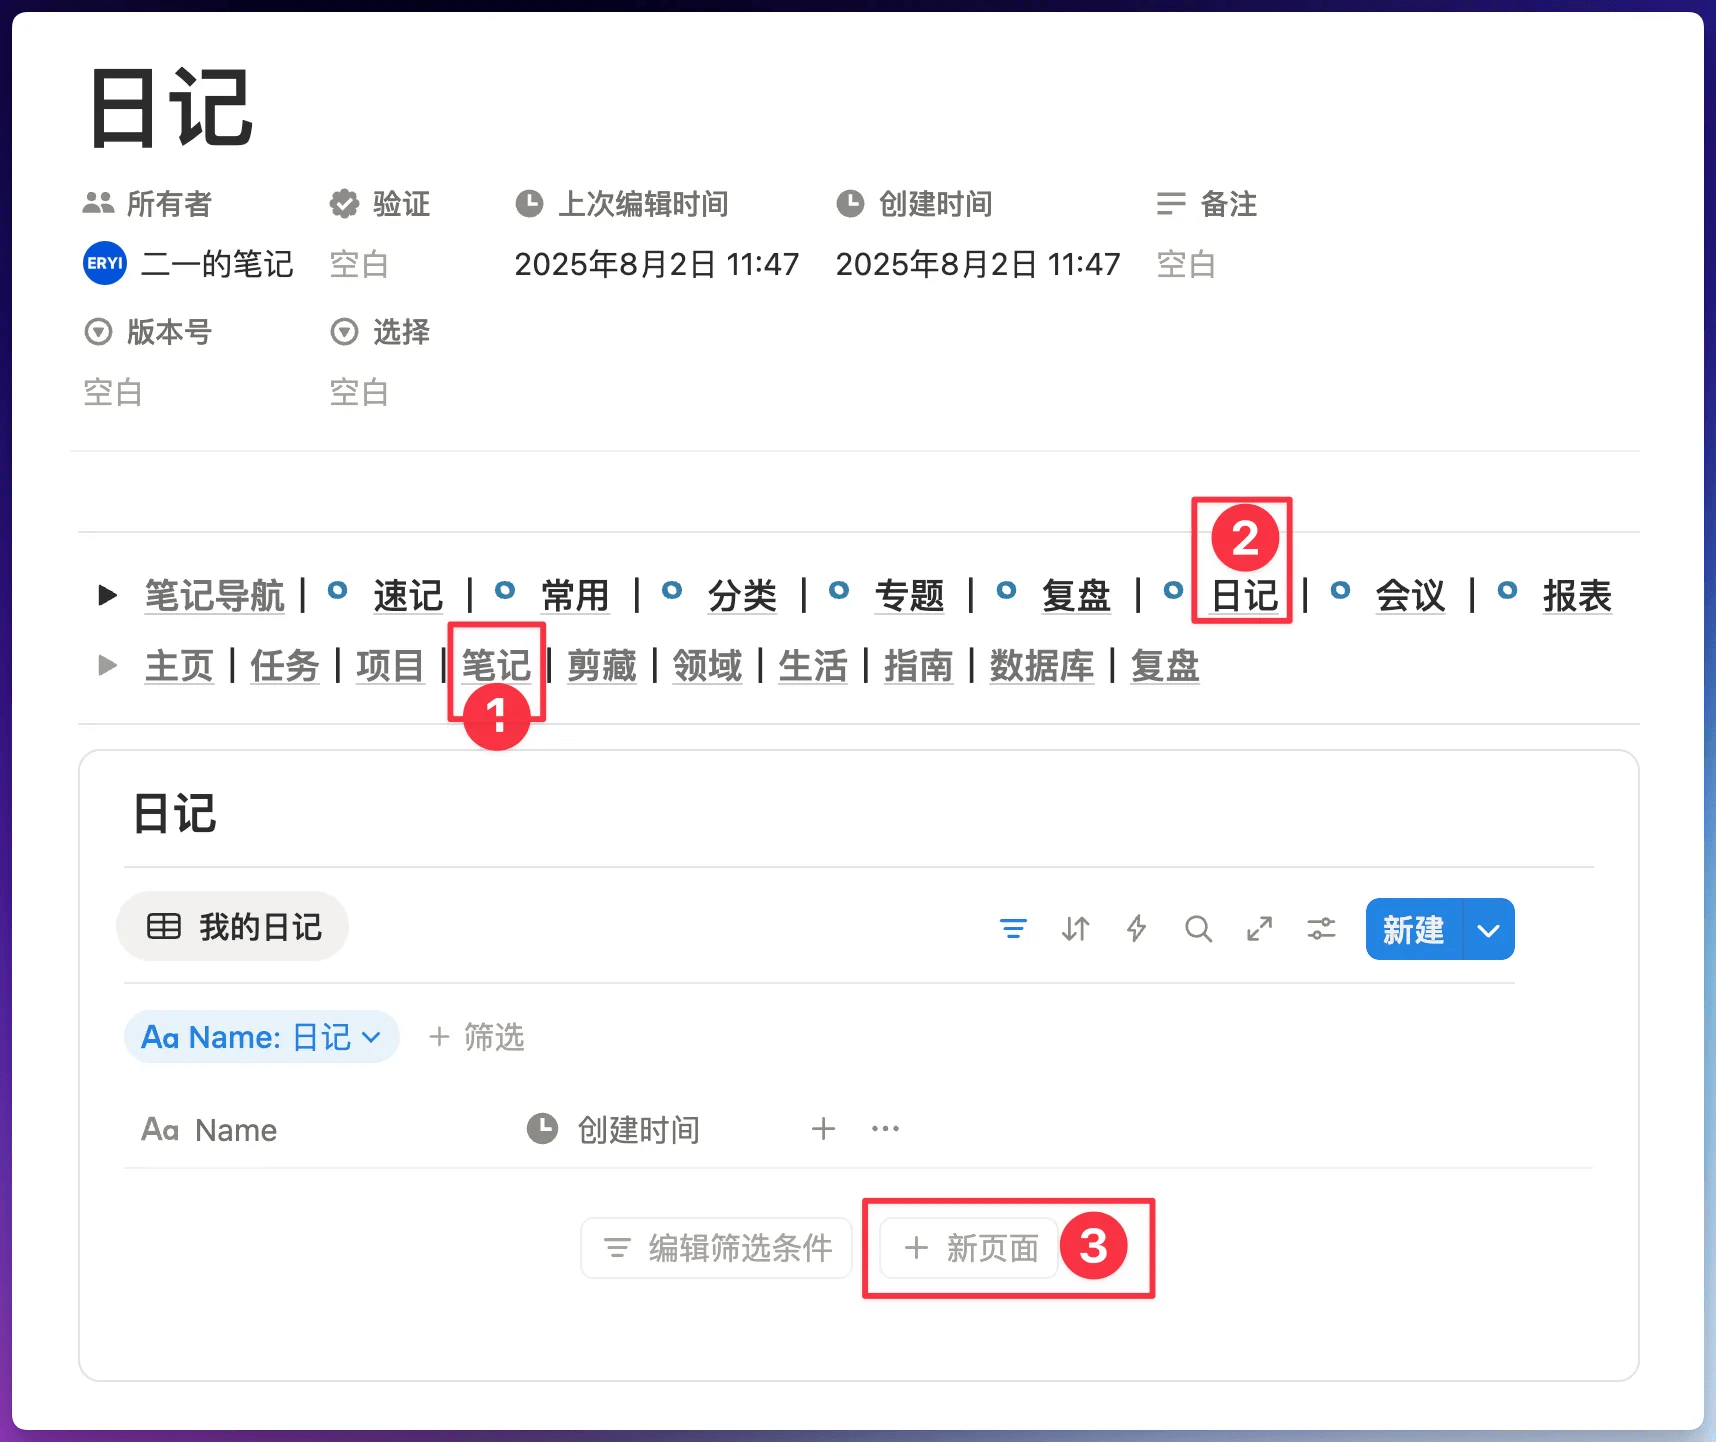
      Follow the process shown below to create a "Diary".
    </p>

    <img src="https://pic.eryinote.com/PicGo/202509130208675.png" alt="Create diary process" />
  </Step>

  <Step>
    <h4>
      Method 2: Title keyword
    </h4>

    <p>
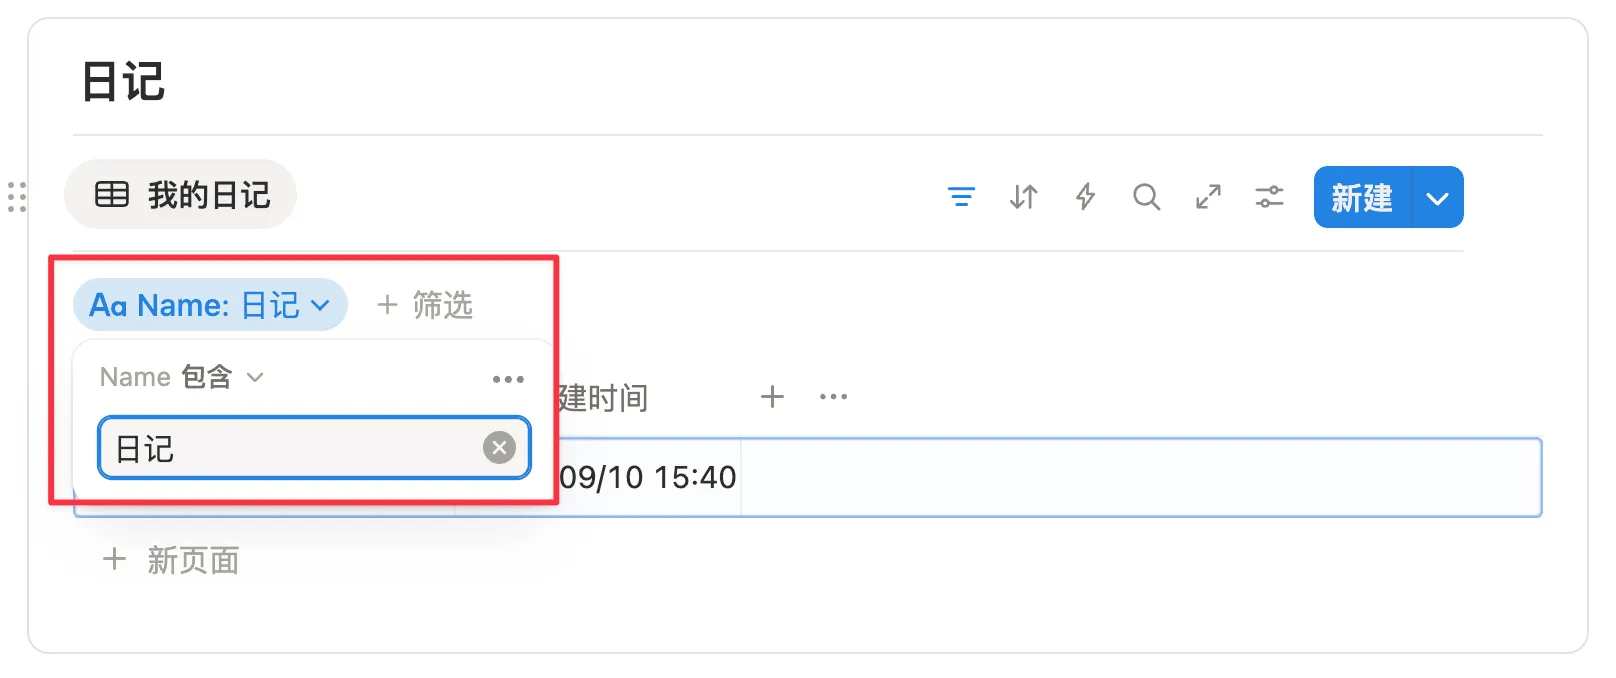
      Add the word "Diary" to the "Title" of any "Note", and it will appear in the "Diary Database"
    </p>

    <p>
      As shown below, this Database has set a filter condition of "contains Diary" for "Title"
    </p>

    <img src="https://pic.eryinote.com/PicGo/202509130209142.png" alt="Diary Database filter" />
  </Step>

  <Step>
    <h4>
      Method 3: Activate diary template
    </h4>

    <p>
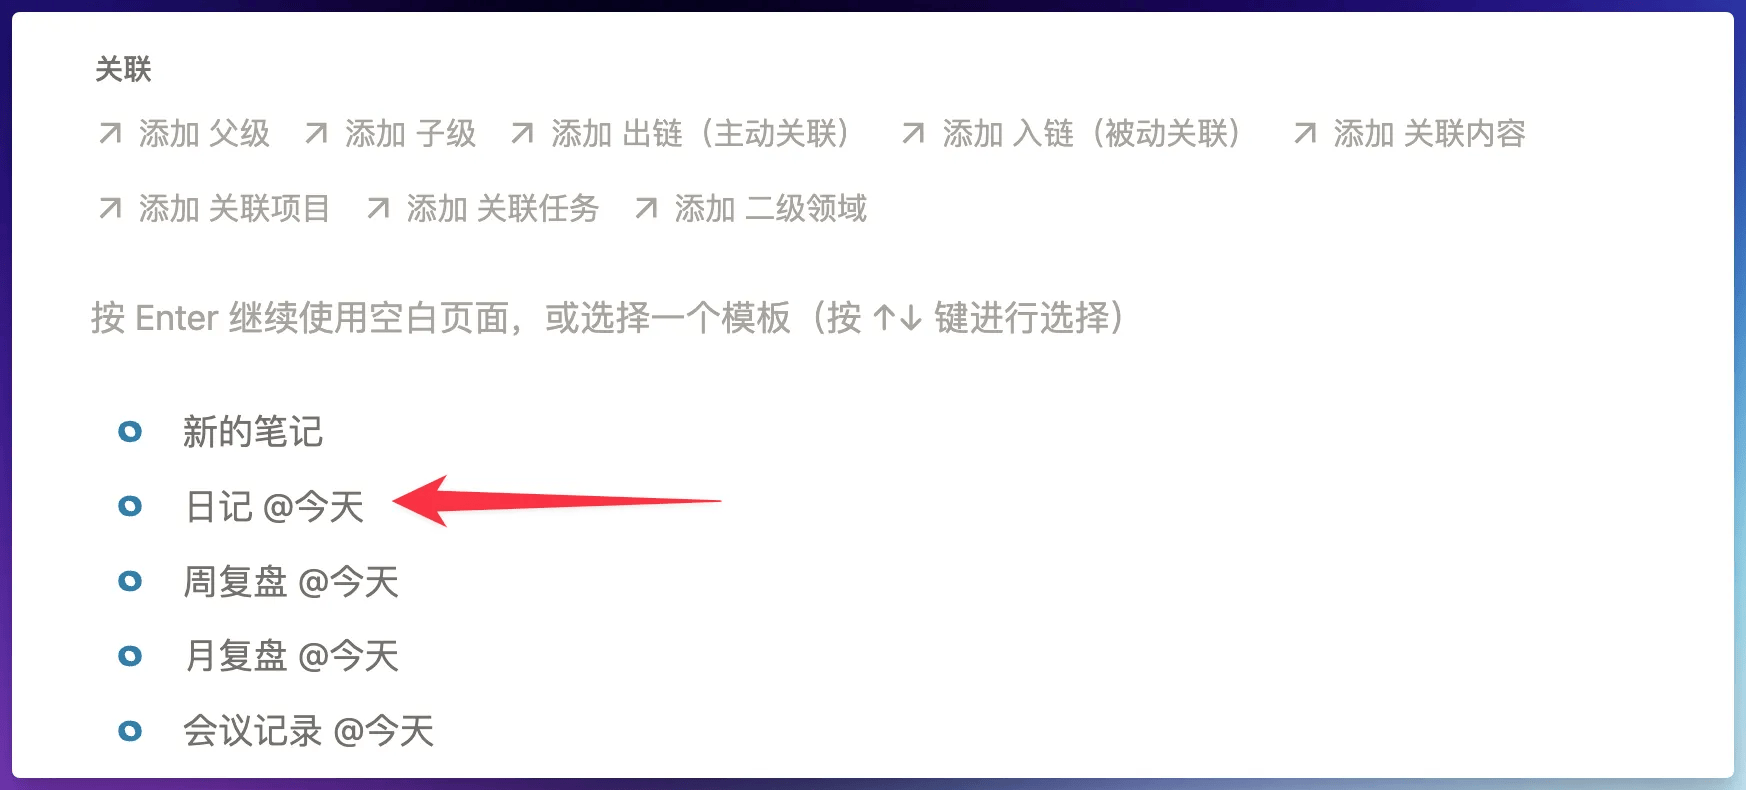
      In the "Note Page", activate the "Diary Template"
    </p>

    <img src="https://pic.eryinote.com/PicGo/202509130209047.png" alt="Diary Template" />

    <p>
      If you don't see the "Diary Template" shown above in the "Note Page", please refer to this solution: 

      <a href="/docs/faq/troubleshooting#template-trigger">Template not showing</a>
    </p>
  </Step>
</Steps>

### Modify Diary Template Method

The current preset diary template is shown below with a relatively simple structure.

![Daily review template table in diary settings](https://pic.eryinote.com/PicGo/202511111918769.png)

If you want to modify this diary template, you can refer to this instruction: [How to modify Database default template](/docs/faq/customization#template-default-edit)

## Periodic Review

### Review Note Definition

In the FLO.W system, "Review Notes" are notes with [Note Type](/docs/properties/note#note-types) as "Exp", so theoretically you don't actually need to create a separate so-called "Review Module", because any note you mark as "Exp" type can become a review note.

![Review notes marked with Exp note type](https://pic.eryinote.com/PicGo/202511111801012.png)

However, to make it more convenient for you to create and manage review-related notes, and improve the efficiency of the "Periodic Review" action, I've added a "Review" button in the homepage navigation bar. Clicking it will take you to the "Review Center".

![Review button newly added to homepage navigation](https://pic.eryinote.com/PicGo/202511111913287.png)

### Periodic Review - Diary

The creation method for [Diary](/docs/basic-feature/note-taking#create-diary) has been introduced in detail earlier, so I won't repeat it here.

From an information type perspective, diaries are "Log" type raw records, while weekly review and monthly review are "Exp" type experience refinements. Putting them in the same module also conveys a philosophy: **recording and reflection form a complete closed loop**. You can only keep diaries without reviewing, or only do reviews without keeping diaries, but when you combine both, "Log" in diaries has the opportunity to be refined into "Exp" in reviews, forming higher-density personal insights.

![Today's diary displayed in the review center database](https://pic.eryinote.com/PicGo/202511111915936.png)

### Periodic Review - Weekly Review

In the "Review Center - Weekly Review" Database, create a new page to activate the "Weekly Review" template, and the preset template content shown below will appear:

![Creating a new weekly review page with template content](https://pic.eryinote.com/PicGo/202511111945249.png)

You can centrally review tasks and projects completed in **this week**, notes, clips, movies watched, and even items purchased in **this week** in "This Week Overview"

![This week overview filtered by completed task dates](https://pic.eryinote.com/PicGo/202511112007920.png)

Taking this week's tasks as an example, this filters out "tasks completed this week" through preset filter conditions. So every time you activate the "Weekly Review" template, you can only see this week's completed tasks, not last week's.

![Task list filtered by completion dates for this week](https://pic.eryinote.com/PicGo/202511112015837.png)

But some users may be accustomed to reviewing the previous week's content on every Monday (new week). Based on the preset conditions above, they can only see this week's tasks, not last week's. So the key here is how to add a new filter view in the "Weekly Review" template to also filter out "tasks completed last week".

Since Notion's filter conditions don't have a "Last Week" filter condition, only "Last 7 Days", the following steps will be somewhat tortuous. The specific method is as follows:

<Accordions type="single">
  <Accordion title="How to filter out each week's tasks in this month" id="filter-weekly-tasks-in-month">
    <Steps>
      <Step>
        <h4>
          Step 1: Understand default template modification
        </h4>

        <p>
          First you need basic knowledge: 

          <a href="/docs/faq/customization#template-default-edit">How to modify Database default template</a>

          .
        </p>
      </Step>

      <Step>
        <h4>
          Step 2: Create filter view
        </h4>

        <p>
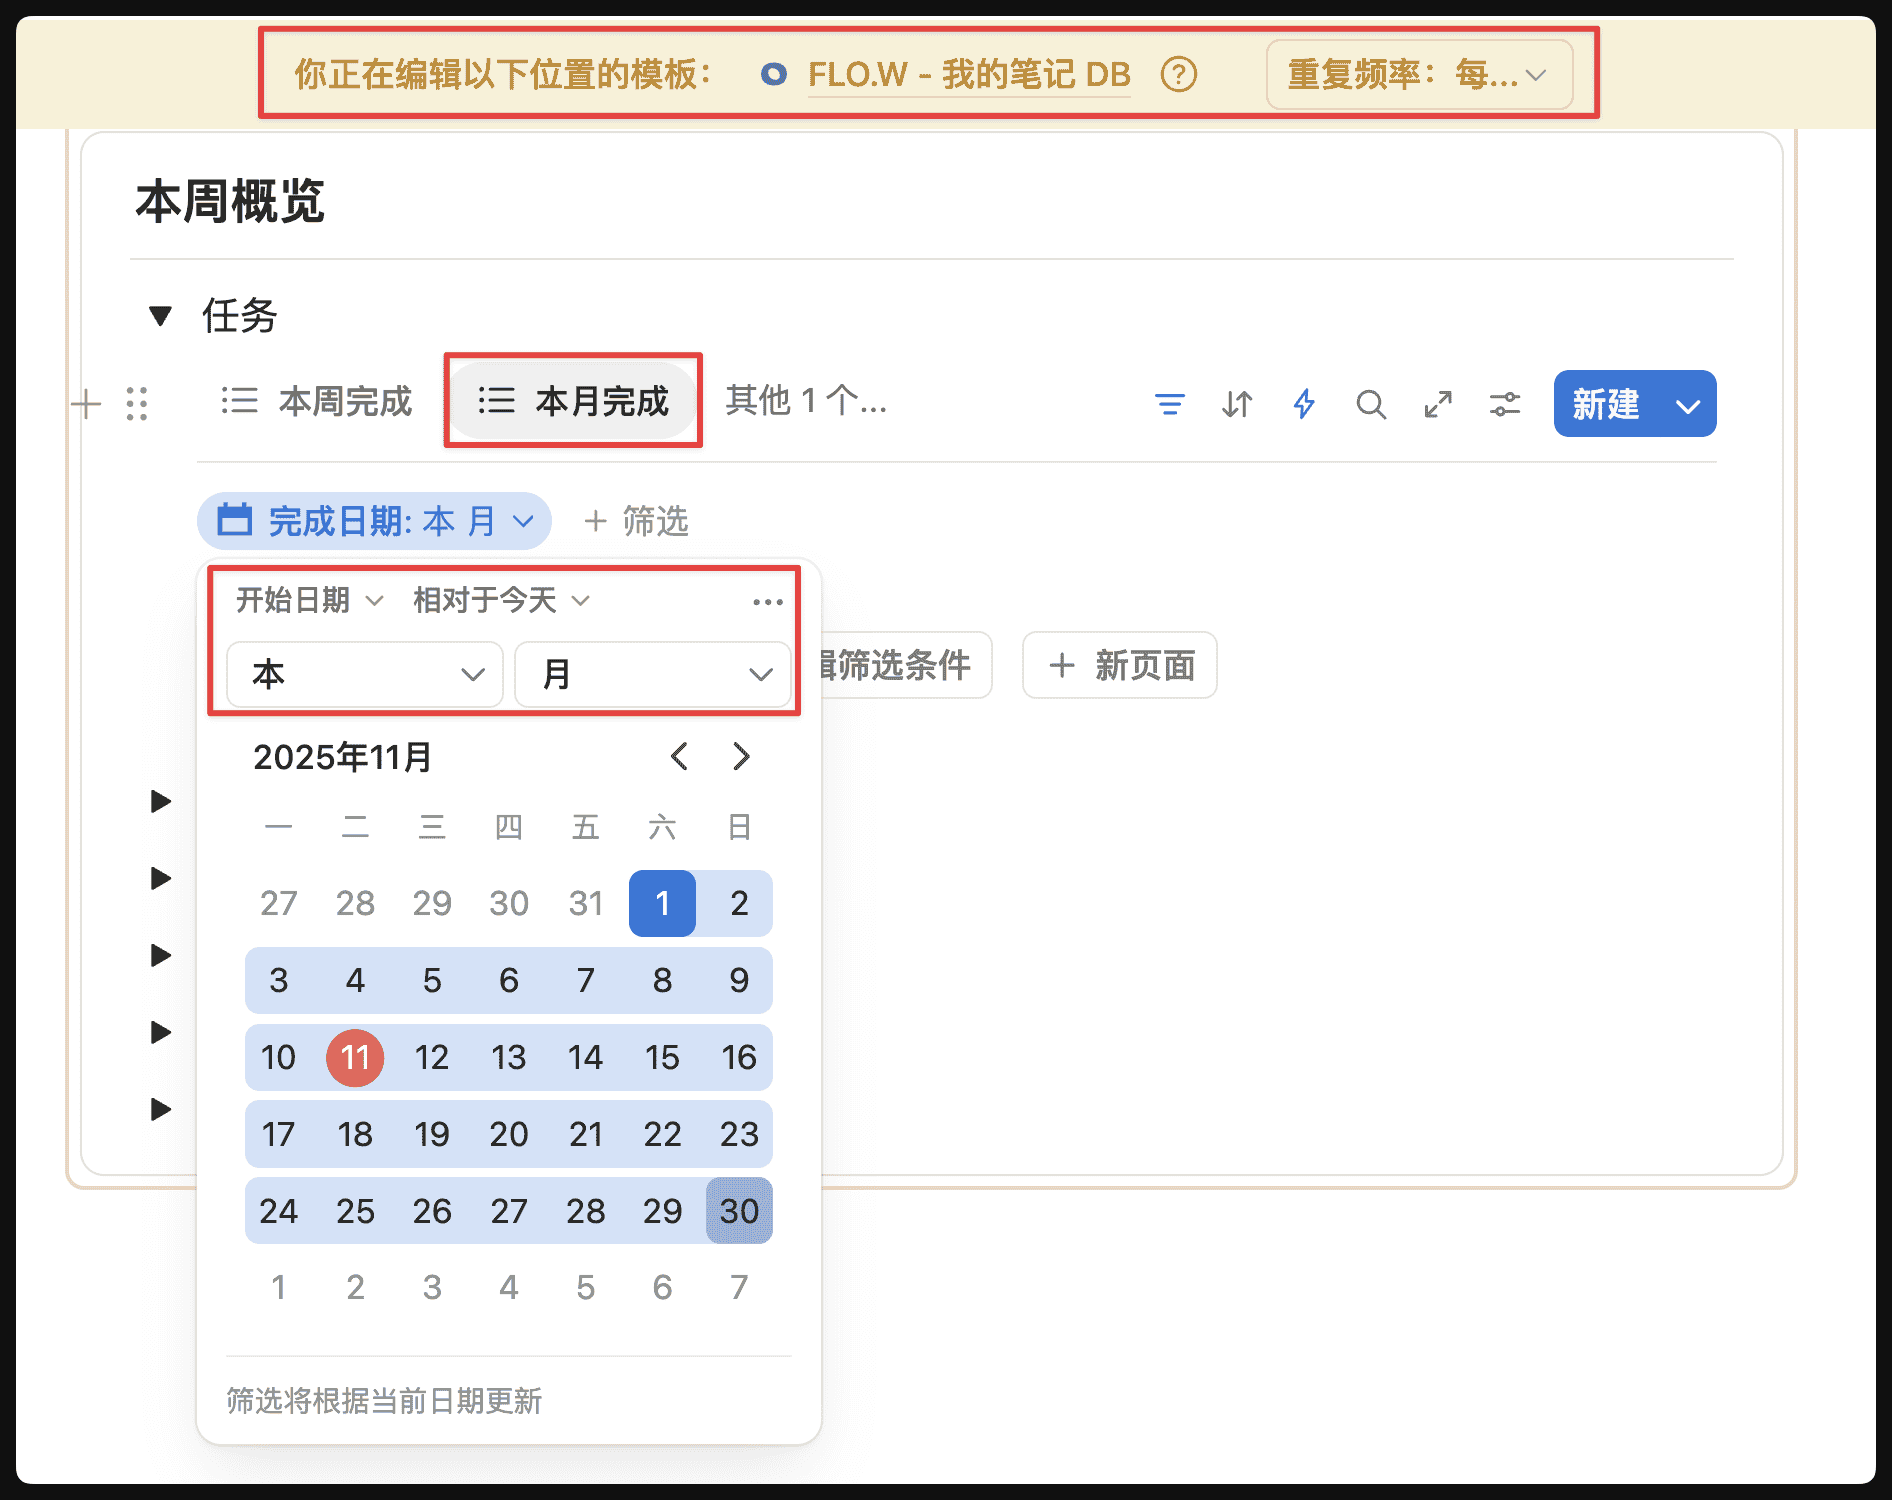
          Find the "Weekly Review Template" and create a new filter view in the "This Week Tasks" Database to filter out "tasks completed this month".
        </p>

        <img src="https://pic.eryinote.com/PicGo/202511112035573.png" alt="Create filter view example" />
      </Step>

      <Step>
        <h4>
          Step 3: Group by week
        </h4>

        <p>
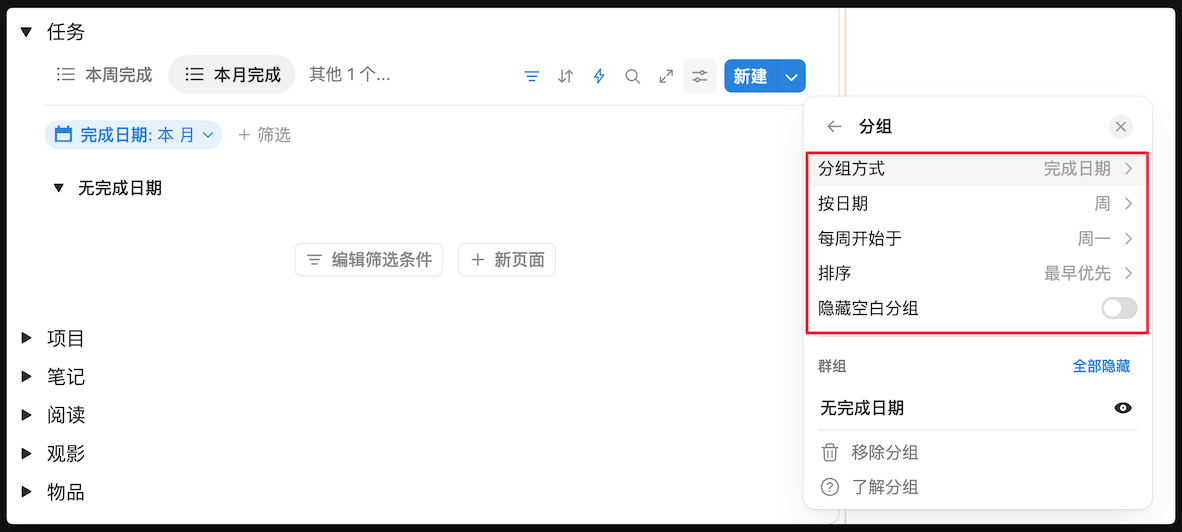
          Group by "Completion Date" and set the grouping unit to "Week", referring to the conditions in the image below.
        </p>

        <img src="https://pic.eryinote.com/PicGo/202511112036148.png" alt="Group by week conditions" />
      </Step>

      <Step>
        <h4>
          Step 4: View results
        </h4>

        <p>
          This way, when you activate the "Weekly Review" template, you can view the task completion status for each week of this month in the "This Month Completed" view.
        </p>

        <img src="https://pic.eryinote.com/PicGo/202511112039195.png" alt="View result example" />
      </Step>

      <Step>
        <h4>
          Step 5: Need help?
        </h4>

        <p>
          If you're not familiar with the above steps, you can ask questions in the 

          <a href="/docs/faq/support#join-feishu-community">Lark group</a>

          . To get faster and more accurate answers to your questions, please explain in detail the specific step you've reached and include images to explain your question, so you can get help faster.
        </p>
      </Step>
    </Steps>
  </Accordion>
</Accordions>

### Periodic Review - Monthly Review

The implementation logic of monthly review is similar to weekly review, just changing the grouping unit from "Week" to "Month", so I won't go into too much detail. If you have questions, you can also ask and exchange in the Lark group.

![Monthly review page showing monthly summary and review table](https://pic.eryinote.com/PicGo/202511112103549.png)

## Quick Note Module Usage Logic

### Basic Usage

The feature location of the quick note module is shown below:

![Quick note module entry and new quick note button location](https://pic.eryinote.com/PicGo/202512191811596.png)

You can click the "Add Quick Note" button, then record in the popup sidebar

![Quick note sidebar and page display with new button and content field](https://pic.eryinote.com/PicGo/202512191812204.png)

But it's more recommended to directly click the "New Page" button, then quickly enter in the "Quick Note Content" property

![Quick note content field and new page button location](https://pic.eryinote.com/PicGo/202512191814399.png)

This property is the content that the conversion buttons read later. The page body below is better for temporary screenshots, links, or extra materials, but it will not automatically enter the Note or Task created later.

### Convert Quick Note to Note

After opening the quick note page, you'll see there are two buttons like this

![Convert to task and convert to note buttons on quick note page](https://pic.eryinote.com/PicGo/202512191815598.png)

Taking the "Convert to Note" button as an example, after clicking, it will create a "Note Page" and copy the content from the "Quick Note Content" property to the "Remarks" property of the "Note Page":

![Converting quick note content to note comment field flow](https://pic.eryinote.com/PicGo/202512191818020.png)

That is, you can use the "Quick Note" feature to capture some unformed, random inspirations or ideas. When inputting, you don't need to think about whether it's complete or how to categorize it. Then you can choose a fixed time to organize all quick note content. If you think a certain "Quick Note" has value for continued improvement, click the "Convert to Note" button to migrate these fragmented thoughts to the more fully functional "Note Page".

One point is easy to misunderstand: the conversion button essentially creates a new Note record and copies the "Quick Note Content" property into it. Due to Notion button limitations, it cannot automatically read or move paragraphs, images, or lists in the page body.

So the "Convert to Note" button can only migrate information from the "Quick Note Content" property, not information below the "Quick Note" page.

![Quick note conversion shows content can migrate but page body cannot](https://pic.eryinote.com/PicGo/202512191821031.png)

If you have already written a lot of content below the quick note page, there are three ways to handle it:

1. Click "Convert to Note" or "Convert to Task" first, then manually copy the page body into the new page.
2. If the content is only text, organize it into the "Quick Note Content" property first, then click the conversion button.
3. If you know from the beginning that you will write a lot of body content, create a "Note" or "Task" directly instead of starting from "Quick Note".

If you subscribe to Notion AI, you can also ask AI to organize and move the page body for you. But this is AI-assisted work, not something the template button can complete automatically by itself.

### Convert Quick Note to Task

The basic logic of "Convert to Task" is the same as "Convert to Note". If this quick note is more like an action item, click "Convert to Task".

Also note that it only brings the "Quick Note Content" property into the Task. The page body still needs to be handled manually or organized with the help of Notion AI.

![Converting quick note to task migrates content to task next step field](https://pic.eryinote.com/PicGo/202512191822328.png)

### Copy Quick Note Button to Other Places

First, the "Quick Note" button exists in two places: one is the "Homepage", and the other is the "Note Module - Quick Note Page" demonstrated earlier. If you want this button to be placed in other pages, just copy this "Add Quick Note" button and paste it anywhere else.

![New quick note button on homepage can be copied and pasted anywhere](https://pic.eryinote.com/PicGo/202512191825199.png)